
Style Arc Ariana Woven Dress
One of my Make 9 items for this year was the Style Arc Ariana Woven Dress. When this pattern dropped last year, I was immediately drawn to it, which surprised me. I don't wear many wovens, especially dresses. But it was one of those patterns that stuck in my mind, so I decided to add it to my Make 9. I have two near and dear fabrics that I plan to use, but before diving in with those I wanted to make a muslin. So here it is!

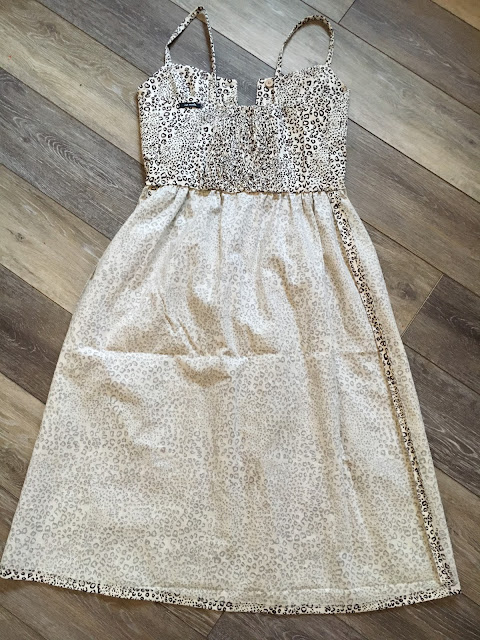
The bodice of this dress is fully lined, with a back panel that it shirred with elastic thread. The straps are narrow and the skirt is gathered into the bodice. There are roomy patch pockets on the skirt. The dress is fastened with buttons up the entire front. You can make a crop top instead of a dress by simply hemming the top.

I rifled through my stash looking for a linen-weight woven to muslin at least the bodice, and ran across this yardage of leopard print linen. I had 2-3 yards (tbh didn't measure) and I can't for the life of me remember what I thought I might do with it. I vaguely recall buying it at Jo-Ann's many years ago, but I almost never buy so much yardage on a whim. Whatever my original plans were, I'm so glad it hung around because it was perfect for my wearable muslin!

My bust measurement is 33", which put me between a 6 and an 8. My waist was between an 8 and 10 and my hips were a 10. I made an 8. I cut just one layer of the bodice pieces, and the straps, for fitting purposes. You do need to create the entire shirred panel piece to properly fit the bodice. It is cut twice as tall as you need it, and then it is folded down in half, and further secured with 1/4" elastic in a casing at the top of the panel. Note: shirring is annoying and takes a metric crap top of elastic thread. I ran out of my small Gutermann spool right away and had to order a giant roll on Amazon.

I basted the bodice and pinned the center front closed. I was pretty happy with the fit everywhere but over the bust along the princess seam, and ended up decreasing the cup size in the top portion of the dress. I would say the dress is drafted for someone who is perkier than I am ;) I'm wearing a strapless bra in these photos, but I will say that I think I could get away with nothing at all. The bodice is nicely fit (now) and the ribcage is tight enough to avoid sagging.

Once I had my princess seam changes noted on my pattern pieces, I went ahead and cut out the second layer/lining. I thought that I might just make a crop top, but since I had so much yardage I went ahead and made the skirt as well. I made no changes to this skirt, but for the next one I will remove 2". I am 5'4" and even though I can't find it noted anywhere, I'm making a giant assumption that the pattern is drafted for 5'6". I might do something differently with the buttons...I like the placement on the top but they feel too close together on the skirt and end kind of high.

Now for the directions...I don't think it's a secret that Style Arc instructions are brief. Per usual, there was one page of written text and one page of diagrams. Seam finishes are rarely mentioned although you need them here. With linens that fray a lot, you'd be best off serging all the edges of your pattern pieces from the outset. There were a few instances when the directions didn't seem to make sense, or when a different method would be better/neater. I ended up following Sewing Like Mad's method, which is clear as mud for someone who doesn't have the pattern and a half-constructed bodice in front of them. But I am here to say that it works, and you will end up with a fully-lined bodice with no exposed seams. The only thing I didn't see in her post was about attaching the skirt neatly. I ended up sewing it to the outer layer of the bodice, then turning the inner layer under and sewing it down by hand. You could stitch in the ditch at the waistline, but I'm not super skilled at that and got a better result by hand.

I also ignored the directions for the straps, which seemed to be saying to fold the raw edges under once and topstitch them down. Instead I sewed them into a tube and turned them. I also ended up shortening them by 2".

The pattern is drafted excellently and all notches matched. Style Arc includes seam allowance markings on their pieces, so you never have to go searching for that information. I always feel a sense of relief when I sew their patterns, they've never let me down and it's clear they know what they're doing. The only "mistake" I'd say they make is by not telling you to interface the front portion of the skirt where the buttons are. There is a pattern piece for the front bodice interfacing, but you also need to interface the skirt. It's just a rectangle so maybe I missed that somewhere, but I'll interface that part next time.

I LOVE this dress so much. It's so different from anything else in my closet and I can see myself with the two additional ones I've planned. The shirring is a total pain in the balls (so is 12 buttons/buttonholes), but the results are worth it.


Cute dress! And animal prints are back,so great fabric for it too! I can see how this dress will be great for summer.
ReplyDeleteIt's so cute! Looks like you ended up getting a great fit, and I love that fabric!
ReplyDeleteReally love that print! Super cute for summer!
ReplyDelete