Showing posts with label projects for kids. Show all posts

Wednesday, March 29, 2023

Pattern Hack: Using Trim as a Sleeve

This post is part of a series this month about the Anno and Pum Kids' Peasant Sleeve Top by Apparel Pattern Making. So far, I've shown how you can lengthen a blouse to a tunic, and how to sew French seams with a side seam split. The last hack for this adorable top is to swap the flutter sleeve for a cute pre-made trim sleeve.

How to Use Trim as a Sleeve

As-drafted, the pattern calls for a cap sleeve on the top part of the armscythe, and the bottom part is finished with bias tape. This method replaces the cap sleeve portion with trim, and then finishes the entire armscythe seam allowance with bias tape.


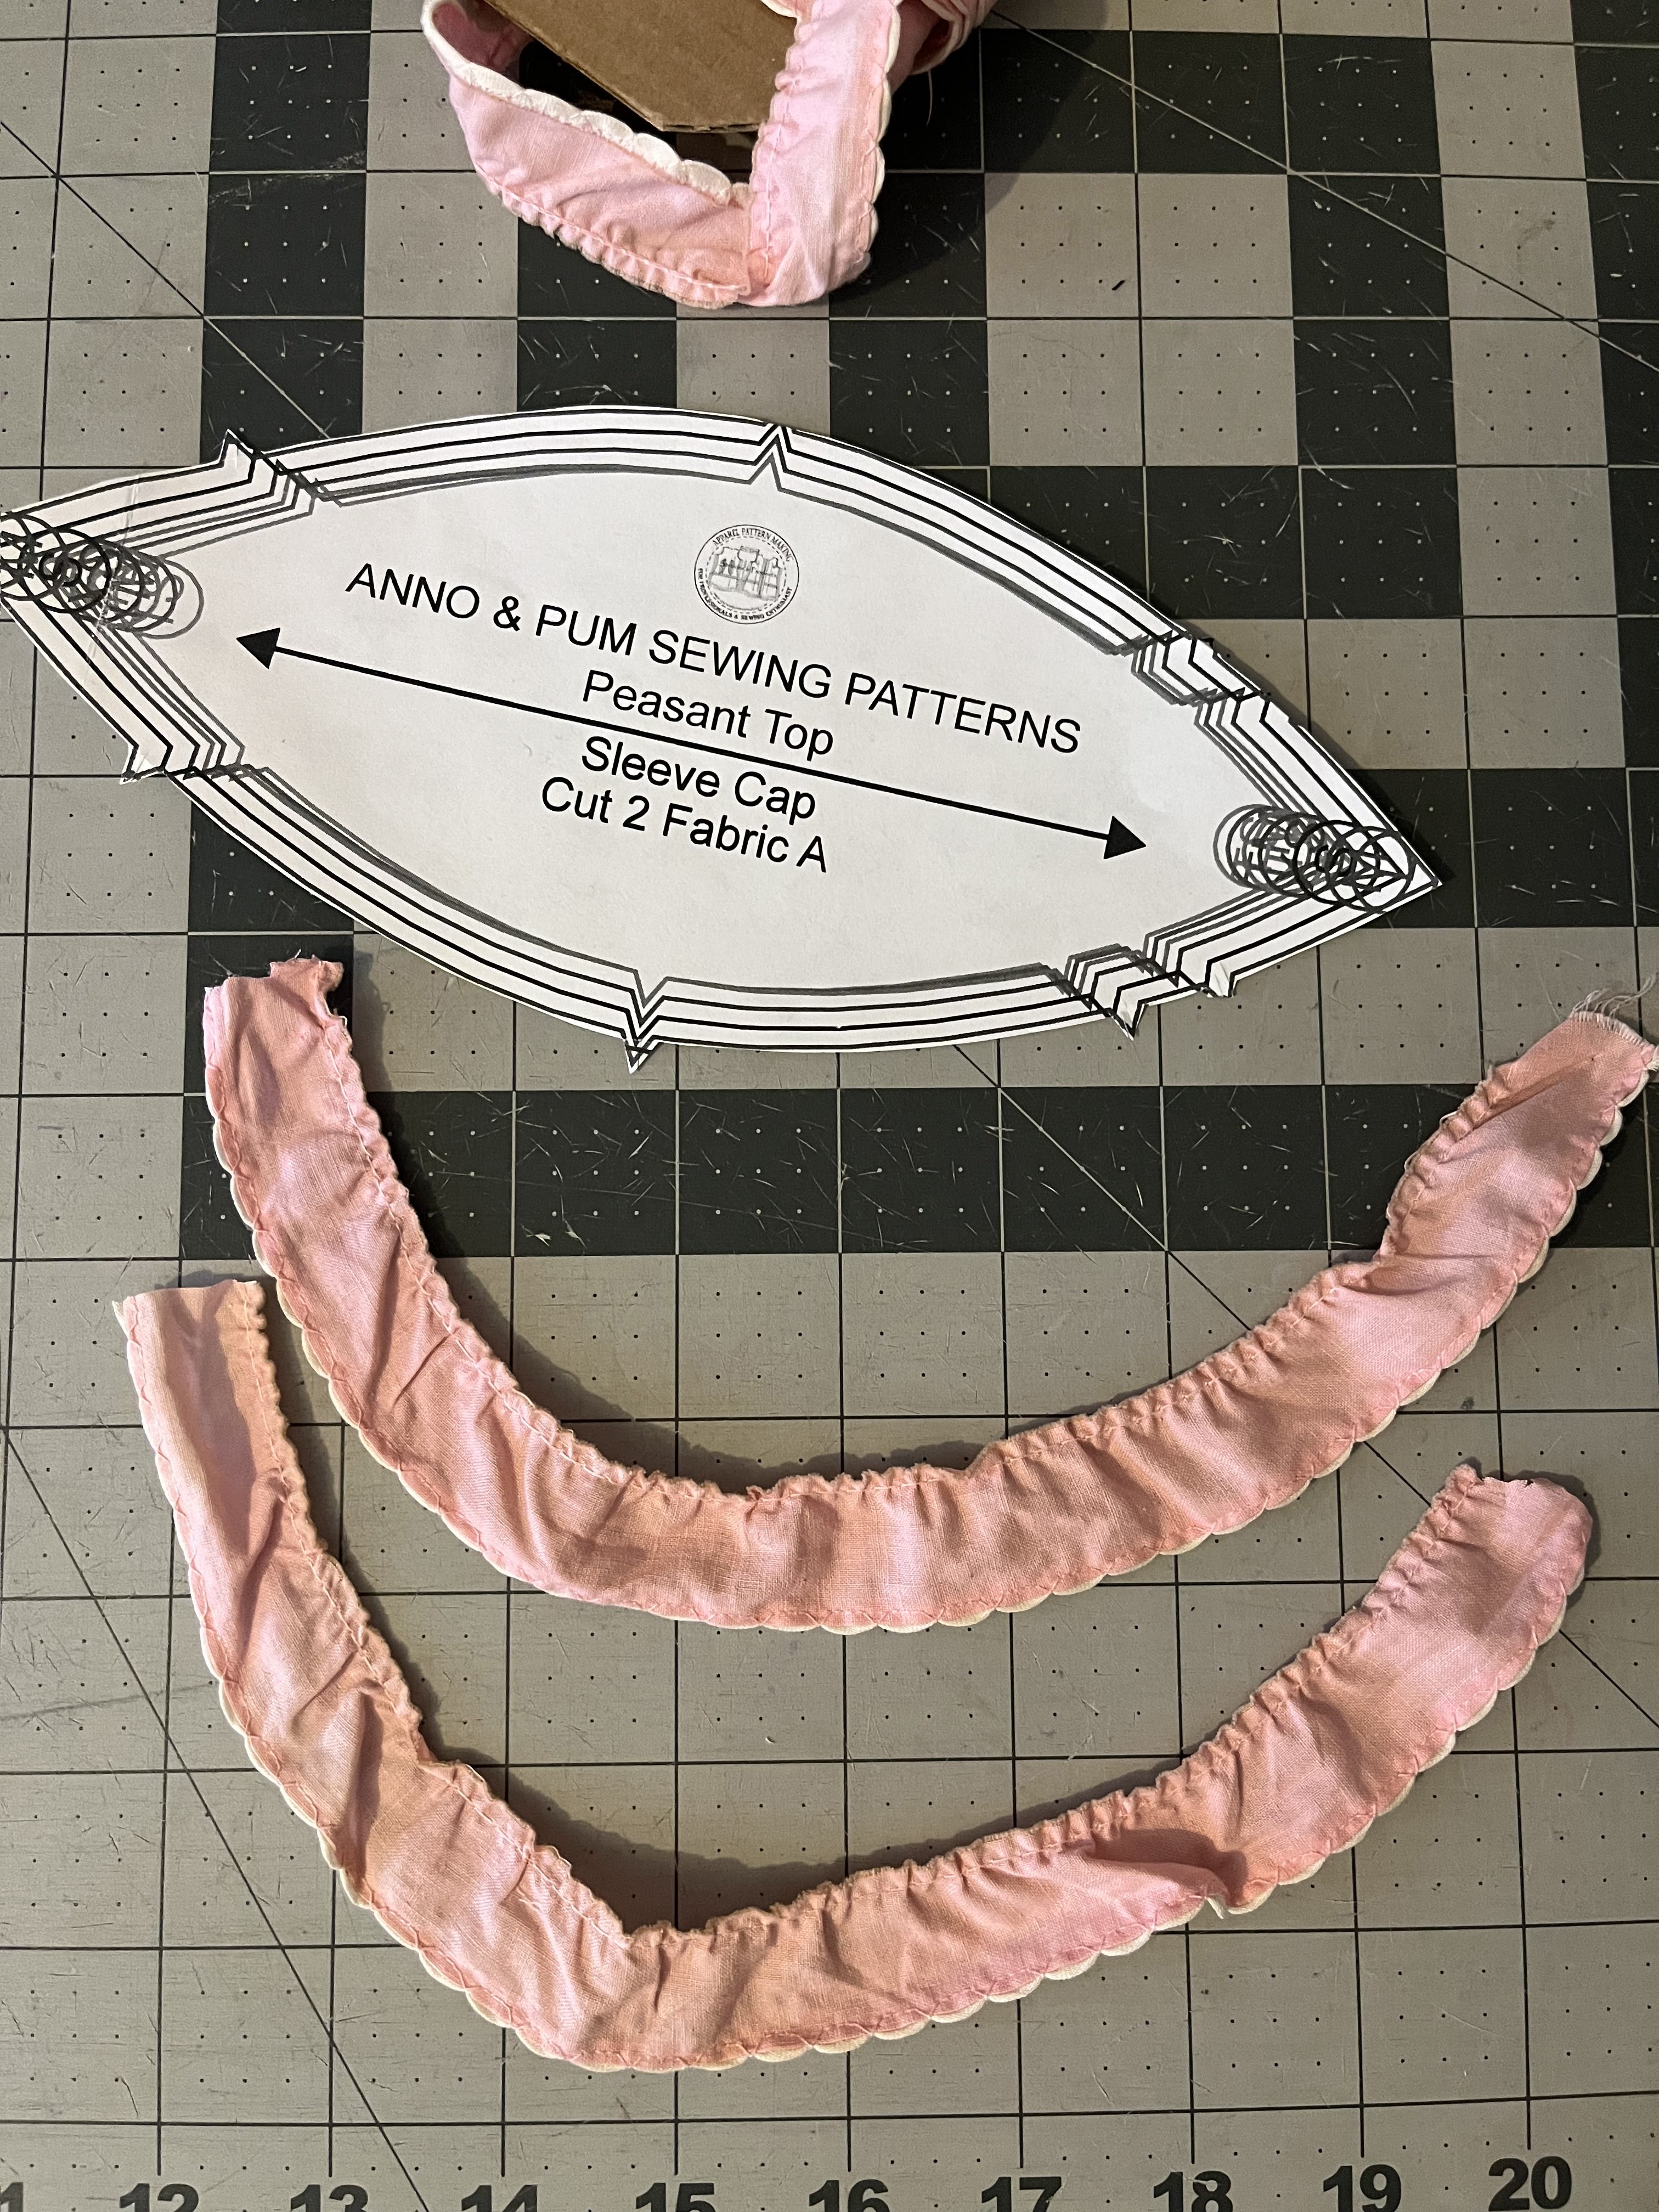
You will need: the cap sleeve pattern piece, the bias tape pattern piece, some ready-made trim and either fabric or bias tape. My trim is vintage and thrifted from a garage sale, but it was the perfect match for this Tencel woven from Jo-Ann's. 

How to Use Trim as a Sleeve

Line the trim up through the center of the pattern, and cut two pieces. 


Before sewing the trim to the bodice, you will need to finish the short ends of the trim. How you do this will depend on the trim, but I just folded mine down and sewed it with a simple hem.


Sew up the bodice until you have the shoulders joined, but before you sew the side seams.


Find the center of the piece of trim and place that on the shoulder sleeve, pinning or clipping it in place right sides together.


Sew the trim to the opening for the sleeve.


Sew the side seams, using the French seam hack if you want!


The binding for the armscythe seam allowance will need to be cut twice as long as the pattern piece. Right sides together, pin or clip the bias binding to the seam allowance, and sew directly over the previous stitching line from sewing the trim to the armscythe. 


Wrap the bias binding over the seam allowance and sew it down again, making sure you're only catching the seam allowances and binding and not the top itself.


You're done! From the outside, you will not see any stitching around the armscythe. If your seam allowances poke out at all, you can tack them down to the side and/or shoulder seams to keep them from rolling out.


This tunic will be my daughter's Easter outfit this year, and she's so excited about it!


I am a freelancer for Anno and Pum Patterns and received this pattern for free.

Tuesday, December 6, 2022

Wool Felt Play Mat and Fairy Stump House

This post contains affiliate links.

I'm hard at work on my handmade holiday, and today I'm showing off the felt play mat I made for my daughter!


Okay, not gonna lie. I played with it myself a little bit. It's just too cute not to! On Black Friday I got a great deal on these two handmade dolls from Ollie Ella. Originally, I thought I would give one to my 7 year old and one to my 6 year old, and that would be that. But things got totally out of hand, and I decided to make a whole universe for the dolls as well.


The fairy stump house was made following a tutorial/pattern from Lia Griffith. This is a company with a subscription-based model. I went ahead and paid the monthly fee of $9.99 to sign up, and immediately received access to this month's projects (15+ in a variety of craft genres) and SVGs (another 15+ here). With a monthly subscription, you also get 5 bonus downloads and can choose from past projects. The fairy stump house was one of my 5 projects and my first download. 


All in all, I'm very happy with the $10 spent and what I get for it. I would have probably paid $10 for just the house pattern! It came with a printable PDF and SVG cut files. I was able to cut all the small, fiddly pieces with my Cricut. I used wool blend felt from Gingermelon, stabilized with Heat N Bond, and cut with my Cricut Explore Air 2.

I have used affiliate links for Lia Griffith, if you sign up I earn a 5% commission ($0.50 on $10). Not making crazy money here, just want to pass along a site I've enjoyed using!


I deviated a bit from the design of the stump house, just based on what moved me in the moment and which colors of felt I had on hand. I also made it taller to accommodate the dolls, and added a bottom. The entire thing is sewn by hand using embroidery stitches. 

The green felt is from Jo-Ann's and is a recycled polyester. It is thicker and sturdier than a wool felt and works great as a base. The fire I made from sticks, hot glue, and felt.


The tent is a linen/cotton scrap. I had 12" dowel rods on hand from making my free banner pattern, and cut them in half with a hacksaw. It took me WAY too long to figure out a good way to make the tent. I tried all kinds of things before I ended up here. 

I hope my daughters appreciate all my hard work and are delighted on Christmas morning!


Sunday, July 24, 2022

Star Student Lunchbox

I've shared a time lapse Reel of my process creating a new lunchbox for my daughter, and since IG doesn't make it super easy to share details, I thought a quick post was in order!

Star Student Lunchbox

Pattern: Star Student Lunchbox from Peek-a-Boo Pattern Shop

Outer fabric: Cotton twill from Organic Cotton Plus

Lining: Ripstop nylon from Jo-Ann's

Insul-bright: On Amazon here

Zipper: Nylon jacket zipper from Jo-Ann's

Unicorn face: Siser Easy Weed HTV from Heat Transfer Warehouse

Unicorn face design: SVG from my shop

Press: Cricut Easy Press 2

This was such a fun project with great results! I'm glad I practiced sewing bags with rounded corners when I made my Sandhill Sling. I have another lunchbox partly cut, this time with a sloth face! 

This post contains affiliate links. I received the outer twill fabric for free from Organic Cotton Plus in 2017.

Tuesday, July 5, 2022

Best Sewing Patterns for Back to School

My kids are now officially one month away from back to school. The summer has gone so quickly! If you enjoy sewing new clothes for the new school year, it's time to get to work. Read on to find the best kid's sewing patterns for back to school! Make sure not to miss the FREE printable planning worksheet!


Grand Slam Tee

A unisex raglan t-shirt? Sign me up! I bought this pattern ages ago, and it's great to have an easy go-to shirt or dress. Raglan sleeves are SO fast to sew. Bonus, you can mix and match leftover knits and have contrast sleeves!


Rebecca Page Brooklyn Joggers

Another pattern that works for girls or boys, the Brooklyn Joggers from Rebecca Page are the highest form of comfort. There are some days when my youngest kiddo refuses most pants, but I can almost always count on her to agree to joggers.


Rio Racerback

My kids start school in early August, so I know it's still going to be pretty hot for the first month. The Rio Racerback Tank and Dress from Peek-a-Boo Pattern Shop is super cute, and the swing hem makes it easy to fit. 

If you make the dress, it's going to fit forever as your child grows and it becomes a top. The two that I made for my girls when they were itty bitty are still going strong as stuffed animal clothes now.


Woodstock Swing Tee (free!)

Another swing style silhouette (can you tell what my kids like?), the Woodstock Swing Tee is more of the tween size range (6-16). The best part is that it's FREE! I often make myself a Union St. Tee (also from Hey June Handmade) and then use the leftover fabric for a Woodstock for my kids.


Oxford Button Up

In case you have a kiddo who likes to dress a little more fancy than t-shirts, you need the Oxford Button Up. With 100+ 5 star reviews you can't go wrong. You have to admit, kids look adorable with collared shirts, amiright? Even my middle daughter likes wearing a collared shirt, unbuttoned, on top of a tank top.


K2 Pullover

Look a little ahead for fall and whip up a K2 Pullover from 5 Out of 4 Patterns. A quarter zip and fleece combine for the perfect nicer-than-a-hoodie pullover. I made one of these this winter and we reached for it a lot for car rides, it's not as bulky as a lot of other outerwear.


The K2 Pullover can be colorblocked, plain, with pockets or without. Tons of options and another great scrap buster!


Rowan Tee (free!)

Another excellent free pattern, the Rowan Tee is even faster than the Woodstock if you omit the long sleeves. This is my go-to pattern for applying heat transfer vinyl, especially for those last-minute spirit days at school.


Do you have any favorite back to school sewing patterns? Don't forget to sign up for emails so you can access the FREE printable back to school planner!

Back to School printable


Monday, April 11, 2022

Easter Coloring Shirt

Some affiliate links have been used. Thank you for your support!

Easter coloring shirt

If you're celebrating Easter this year, try this fun project with your kids! I've used a shirt I sewed myself (with a free pattern!) but it also works with a store bought shirt (I like the selection at Micheal's). You will also need my cut file and a cutting machine, HTV, markers, and some scrap cardboard. We used a combination of fabric markers and washable markers.

You can find my cut file design in my shop here. It comes with a couple other looks, in case you have multiple kids who don't want to match. I have a Cricut Explore Air 2 and use that to cut all my vinyl.

Easter coloring shirt

As I said, I sewed my own shirt using the Rowan Tee pattern from Misusu Patterns. I used a cotton jersey from Dharma Trading Company for the body.  I applied the HTV as soon as I cut the front piece out, before assembling the rest of the shirt. For HTV, I recommend Siser Easy Weed. I buy mine from Heat Transfer Warehouse.

Easter coloring shirt

I finished sewing my bodice and decided on some nice stretchy rib for the neckline. I think the pop of pink looks cute!

Easter coloring shirt

Once the shirt is finished, slip a piece of cardboard inside before you give it to your kiddo, as the markers will likely bleed.

Easter coloring shirt

My daughter loved this project and her new shirt!


Friday, November 17, 2017

Wool Peacoat with Organic Cotton Plus

It seems I'm on a coat-making kick when it comes to using fabrics from Organic Cotton Plus. My previous review was a Kelly Anorak with their fabulous pink cotton twill. I knew that this time around I wanted to make my oldest daughter a winter coat, and I couldn't be happier with how it turned out!


This is the Olivia and Oliver Peacoat from Peek-a-Boo Pattern Shop. I made this coat once before for my daughter, when she was just a baby (sob!). I've always wanted to make it again, and I'm so glad I did!


For my outer fabric, I chose this navy wool (it comes in 11 colors!). Aside from being the classic peacoat color, it also matches my daughter's school colors. I wasn't quite sure about the fabric and whether it'd be suitable for a coat, but I looked through the older posts from other OCP bloggers and found a coat made from the same fabric. Double-checking the weight (13 oz/sq yard) led me to believe that it would be a bit lighter than wool melton, and I was right.


For the lining, I settled on a beautiful golden poplin from Cloud9 fabrics (doesn't say the maker online but it was on the selvedge). It is a little "sticky" in that it doesn't glide over clothing like a silkier fabric would, but I wasn't interested in purchasing polyester just to make dressing easier (have you ever dressed a Kindergartner? It's not easy, no matter what they're wearing!).


Both of these fabrics were absolutely wonderful. The wool, in particular, was a great surprise. I've worked with heavy wool in the past and when you start adding layers, it becomes very difficult to sew. Then when the coat is finished it weighs a million pounds. My daughter is still in a five point harness carseat, and I needed her coat to be slim but warm so that she can be buckled properly on her way to school.


The pattern is surprisingly simple. No collar stand, no pieced facing/lining (only the back panel and sleeves are the lining fabric). Minimal topstitching. But the impact is strong. I opted for only a single row of functional buttons. Extra buttons usually end up confusing my kids. After a quick muslin of a size 6 (my daughter will be 6 in a few months) I realized it was a little too small for wearing over a cardigan, and I wanted it a bit wider. I slashed and spread the front and back pieces from the shoulder to the hem. I spread them 2" at the hem on the front (4" total with two pieces), and 1" on the back (piece was cut on fold so 2" total added). I also added in-seam pockets, and I rounded the collar for more of a Peter Pan style.


My daughter goes around school telling everyone that her mom made her coat, and I kind of want to cry over how sweet she is! The changes I made resulted in a bigger coat that will hopefully fit the entire season, and dare I hope for next season as well? We'll see.  At the very least, her two younger sisters will have a high-quality garment to wear when they're older.


If you want to nab some of your own beautiful, all natural fabrics, make sure to follow Organic Cotton Plus on Facebook or Instagram. They will be having a big Black Friday/Cyber Monday sale next week. There have been a few teasers of new products and they look amazing! You can also sign up for emails on their website. Thank you so much to Organic Cotton Plus for sending me the fabric for this review!


Fabric for this review was sent to me for free. I purchased the pattern and notions. This post contains affiliate links. All opinions are my own.

Thursday, October 19, 2017

Foxy Pajamas

This post contains affiliate links.

Every now and then, I impulse-buy a fabric with a novelty print, thinking that I will be THAT cool mom with such quirky style. And then the fabric sits in my stash, because in truth, I'm a boring basics kind of mom. But when life (or your bad decision-making) gives you graphic prints, you make pajamas. That's a saying, I'm sure.


I've had this fox jersey for ages. It's from Girl Charlee, but it is not one of their modified reprints. If you've followed them at all you've likely seen this fabric, but printed by them with a lighter background. Personally, I love the dark background, I think it works better with the orangey-red and white of the foxes. I'm not sure where it originally came from, but I bought the very first batch they ever had.


Originally, I wanted to make a Day Tripper top for myself (exactly like this one, actually) but never got around to it. I finally accepted it wasn't going to happen, and that pajamas for my oldest would be a much better use for this fabric.


The fabric is a simple cotton/poly jersey, no spandex. I knew I couldn't go with my default PJ pattern, the Alex and Anna PJs from Peek-a-Boo Pattern Shop. Those are drafted with negative ease and need good recovery in the fabric. Instead, I went with positive ease and more of a t-shirt and sweatpants look. For the top, I used the Day Camp Tee, and for the bottoms I used the Pajama Party pattern. Both are FREE from PABPS (for the Pajama Party pattern you need to join the Facebook group and get the code). Such a quick sew on my serger and did I mention FREE?


I'm so glad this fabric is finally sewn up, and AB loves her new jammies!

Speaking of Peek-a-Boo Pattern Shop, check out her newest pattern, the Hazel Dress and Tunic. On sale today only for release day!


Newsletter sign up

.