Thursday, July 31, 2014

Pink! Blue! Pink! Blue!

(Name that Disney movie...)

I'm not sure I'm great with combining colors. I'm trying to get better. My lack of confidence in this area meant that I'd never made a color-blocked garment before. Until now!


To make it easier on myself, I went with a pattern meant for color-blocking, instead of trying to figure out the best way to divide a pattern I already had. This is Vogue 8950, in the smallest size (6).


Pretty basic, I know, but I liked the tunic length and the options for different sleeve lengths. I decided to pair two of my Wardrobe Architect colors, navy and baby pink. I'm kind of surprised by how well these two go together, but I really like them! Maybe I can be a little more adventurous in color-blocking in the future?

Vogue 8950
For some reason, the pink kept
getting washed out in these photos...

I don't know where I got this crazy idea, but the navy is a sweater knit and I sewed this up in June. Wha...? It hung in the closet for a month before I got a chance to wear it, on a particularly cool day (we've been having a lot of those this summer, after a brutally cold winter). It's a poly-spandex blend from the remnants at Jo-Ann's.


The pink is a sheer tissue knit from Mood. It's polyester as well, which was purposeful. If I'm mixing fabrics, I'd rather they were the same fiber so care is easy to remember (who am I kidding, I wash everything in cold and tumble dry low). I normally don't work with sheer knits, but I thought I could get away with it if it were only a yoke. It does work...but duh you can still see my bra straps. And ain't nobody got the patience to deal with a strapless bra under a t-shirt. I wish I would have underlined it/used two layers. Ah well.


Now about the pattern itself. It called for a narrow hem on the neckline (ick) so I sewed a band on instead. I did not remove any seam allowance before doing that, so the neckline is higher than it would be if you followed the directions (I like it my way). Normally I would also need some sort of narrow shoulder adjustment, but the band kind of sucked in the neckline and kept it nice and flat, no gaping!


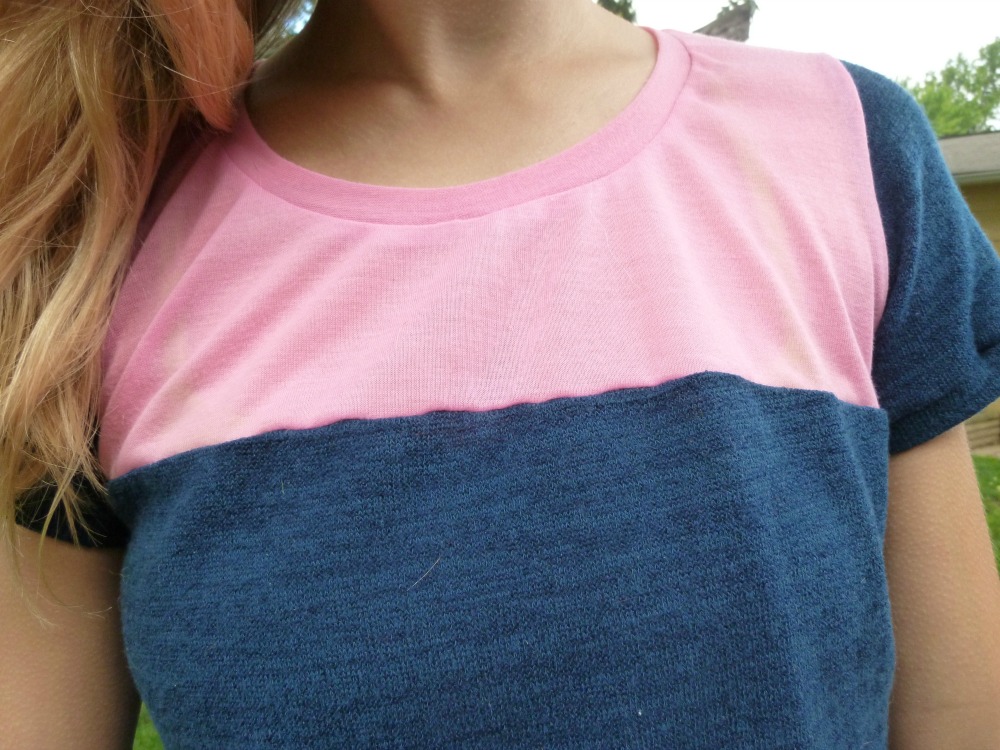
I considered topstitching the seam allowances down, but as you can see the seam was already a tad wavy. Since these are both polyester, no amount of heat and steam fixed the issue. I don't think it's too noticeable IRL, although looking at this photo is making me crazy.


The instructions tell you to set in the sleeve. In a knit. Double ick. I suspected that the sleeve cap might be unnecessarily high and require a ton of easing, and I was right (I measured). I folded out about 3/4" of the pattern before sewing, and then had to remove even more height out of the sleeve cap as I sewed it in (flat). Poor drafting by Vogue and perhaps a big enough reason to prevent me from ever sewing this pattern again.


Because I decreased the length of the sleeve so much, I added a hem band instead of a regular hem. By that point I was tired of working with the sweater knit so was happy to take the easy way out. I think you need length in the sleeve, otherwise the proportions are all weird with the tunic length in the bodice.

Interfaced hem, wrong side.

The hem had me stumped for a few days. My tests with the sewing machine and a straight stitch were not satisfactory (I did all the other sewing with my serger). I also had to deal with side seam splits. In the end, I interfaced the bottom with 1" strips of knit fusible interfacing. Then I turned it up and sewed the hem like normal, squaring up around the slit. The interfacing miraculously fused to the polyester without issue. The hem was nice and crisp and easy to sew, but not stiff because I used knit interfacing (from Jo-Ann's...I love this stuff!). 


My only regret is that I didn't finish the insides as nicely as I could have. I honestly thought this pattern would be a complete bust and didn't try that hard. Turns out, I LOVE this tunic and I know I'll be wearing it a lot this fall. I should probably go back and coverstitch the hem to hide the interfacing that's peeking out, but my navy cone thread doesn't exactly match (says the woman who used white serger thread on the inside). Ah well, I'm the only one who sees it so I guess it's not a big deal.


Because I was having such trouble photographing the colors, I went inside and tried and ended up with this crazy outtake. This is my life: she's always moving.

What do you think, was my first time colorblocking a success? Have you tried it, or are you nervous like I was?

Free shipping on A Sewist's Notebook! Use code LJSD14 for free mail shipping, or half off ground shipping. Offer ends August 6th.

Wednesday, July 30, 2014

What I'm Reading: Easy Guide to Sewing Linings

Many many moons ago (whoa, almost a year!) I read this post on A Fashionable Stitch about a book from the Sewing Companion Library, Easy Guide to Sewing Linings by Connie Long.


This book is no longer in print, and Sunni pointed out that its cost used can fluctuate wildly and be quite expensive. After reading her post, I added the book to my Wish List on Half.com (love!) and waited.

And waited.

And waited.

Finally, last month the price dropped to a reasonable level (I think the total was about $10 with shipping). Hooray! Sorry for you, but the lowest priced copy has jumped back up to nearly $40. My suggestion: sign up for email alerts and buy it the second the price goes down!


The book is as good as Sunni says. There is a ton of information on lining fabrics and how to choose the right one. There are chapters on all the different garment types, like coats, dresses, skirts, pants, and even vests! Y'know, in case you get in a time machine to 1987 and are taking this book with you.


Since I'm not currently working on anything with a lining, I've mostly been browsing/skimming rather than reading cover to cover. I learn by doing, so the next time I have to line a garment I'll pull this out and follow along. But even minimal reading has revealed great nuggets, tips, and "ohhhhh that's how you do that" moments.


Along with the typical information, there is lesser-seen instruction on lining lace fabrics, sweaters, and working with vents. Each chapter covers how to create your own lining pattern pieces if you garment pattern didn't come with one.

In short, if you see this book for a good price, buy it! I don't sew linings that often, but with this book on my shelf I'll feel much better about attempting it. Do you have this book or another reference for sewing linings?

Tuesday, July 29, 2014

Knit Finishes Part Four: Fold-Over Elastic

Hello again, and welcome back to my series on Knit Finishes! Be sure to catch up on the previous installments: a band, binding, and a narrow hem.


Today I'll be discussing a lesser-known finish, fold-over elastic, also known as FOE. If you sew primarily adult clothing, you may not have heard of this type of elastic. It seems to be more common in children's clothing, but there are some great applications for womenswear as well.


Fold-over elastic is a type of elastic that is twice the desired finished width. It has a lengthwise groove down the center so that it folds over a raw edge, encasing it completely.


FOE is available in many colors, prints, and widths. Try Harts Fabric, The Ribbon Retreat, or Peak Bloom. Price seems to vary widely, so shop around. It's also recently become available at many Jo-Ann Fabric Stores, but make sure you use a coupon!


It typically has one slightly plush side (the right side) and a flat side (the wrong side).


FOE can be used on a neckline, armhole, or on the edges of things like underwear, swimsuits, and leotards. I also used it as a waistband on this skort for my daughter:

July 4th outfit, last year

FOE works particularly well when you need to finish an opening that contains multiple layers of fabric, such as on a bra edge which has an exterior layer and a lining (see this excellent post on the Ohhh Lulu blog). It's also great on underwear because it finishes the edge in a neat, usually decorative way, while also being functional due to its stretch, which is typically better than self-fabric or some other kind of finish.

I'll admit, I've had my struggles with FOE. Application gets easier with practice, but if you screw it up it can be difficult to salvage the item. I recommend starting with a project like underwear, since the final result will be hidden and takes very little fabric. For my example here, I'm using the free underwear pattern from So, Zo...What Do You Know, which you can download here.

Note: this pattern is designed to be used in combination with FOE. If you are adapting a different pattern, please do the math on your seam allowances to decide if you need to cut away fabric from your opening (depending on the width of your FOE and the pattern's particular finish).

FOE is applied in two steps. The So, Zo... pattern does not indicate how long your FOE needs to be for each opening. You CAN sew on a long piece and then cut it off, but that method has never worked for me because I can't get the degree of stretch to be consistent.


In order to be more precise, I laid elastic next to the leg opening and pre-cut it. I attempted a 1:1 ratio (in other words, the elastic is the same length as the opening) but I think I ended up with the elastic a little bit shorter. Either way works, but don't cut it TOO much shorter or it will be very difficult to apply (ask me how I know!). On underwear, the leg elastic should be only a teensy bit shorter so that it's snug but not tight. On the waistband, you can definitely cut it shorter so that it stays in place. Again, it takes practice to know the right ratios for your particular pattern.

Start with your pieces WRONG sides together, with the elastic on the bottom. This will ensure that the wrong side of your garment has two visible stitching lines, and the right side only has one.


The raw edge of your fabric should sit right along the center of the elastic, where it will be folded over. Start sewing using a zig-zag stitch. If you want to get fancy, you can also use a 3-step zig-zag, which is extra stretchy. On my machine (affiliate link) that's stitch number 5.


I've used a regular zig-zag in my sample, just because it's faster to sew. The trouble with FOE is that it's used almost exclusively on curved edges. You will need to stretch and manipulate the elastic to match the curve of the fabric, without stretching the fabric. Let me repeat: do not stretch the fabric! This is the part that takes lots of practice and 20 hands. Luckily for you, I have a little trick that makes it easier.


There is such a thing as a fabric glue stick, but I've never bothered to buy one. I use a plain old craft glue stick, which says it's permanent, but it always washes out. I don't recommend this method unless you've tested it first, and generally only on natural fibers (the fabric I'm using is a cotton jersey).

Lightly apply the glue to the wrong side of the FOE. The glue should provide enough grip that you can use your fingers and press the fabric into the glue, keeping the curved fabric edge in place along the straight center fold line of the FOE. If you don't use glue, the fabric tends to slide away from that middle groove as you sew, and you inevitably stretch it out trying to get it to behave. Once you've sewn the first pass of the FOE, it should look like this:


Ignore the slight waviness, it should be eliminated during your next time through the machine. DO NOT PRESS FOE if you can avoid it. The one and only time I've ended up with gunk on my iron was due to pressing fold-over elastic. It is usually covered in some sort of decorative dye, and I literally transferred polka dots onto my iron. If you must press out waviness, use a press cloth and very low heat.

Next, fold the elastic along the center groove and encase the raw edge where you just stitched. If your machine is having trouble moving the beginning of the fabric/elastic combo, gently pull the thread tails to help it through.


For the second pass, you must sew with your stitches right on the edge of the elastic. If you sew near the fold, then the elastic will curl after washing, and look terrible. Again, use a zig-zag stitch. You can pin the elastic over, but I typically sew slowly and fold it over as I go. I hate pinning elastic.


You can see in the following photo that my zig-zag stitching is right on the edge of the elastic:


Ta-da!


It may be tempting to sew on FOE in one pass, instead of two steps. My experience is that your fabric will shift and it's just not worth it. Sewn the correct way, with practice, FOE can be a great resource for finishing tricky stretch garments. Give it a try next time you're making undies or a bra. I definitely recommend the So, Zo... pattern and underwear is very fun to sew. What's better than the best dress in the world? Wearing matching underwear with it!

Next week: French binding

Friday, July 25, 2014

Project Runway rehash!

Am I the only one who didn't know there was a pre-show "Road to the Runway" thingy airing before PR? Thank goodness for a DVR that's smarter than me! Although I feel like it's a needless waste of time (not to mention angst on the part of the eliminated designers). It did surprise me that Emmanuel didn't make it into the competition.

Spoilers ahead...

Highlight: I was happy that the first challenge was open-ended. Sure, the fabrics were somewhat limited, but that's real life. They all had an equal chance to show a spring look, something that they'll have to do for the rest of their lives.

And I'm sure next week will be a completely unfair unconventional challenge.

Lowlight: Korina's cattiness was tiring. Maybe my threshold for bad-mouthing is getting lower, but I will never understand how these designers have time to pick apart someone else. Shouldn't you be worrying about yourself?! Her face when Sandhya won made it all worth it.

Best garment: I liked Char's design quite a bit, although I'm sure if she had her choice she would have gone with different textiles. It was very YELLOW! I was very surprised she didn't win.

I also liked Angela's look, particularly the pants. I wish I were that girl!

Worst garment:

Me to my husband: "I hope Sandhya doesn't win, because her's was ugly."
Heidi: "Sandhya, you are the winner."

It was SO. BAD. There's always one WTF judging moment each season, but I didn't expect it to come this early! And Jefferson's? I thought he was in the top. It had its flaws but at least it didn't look like it got caught in a Sharknado. I did love Sandhya's mini collection she brought to the interviews (all the pink and blue!!) so we'll see where she goes from here.

Also? Hated Amanda's shark teeth pants.

Best line of the night: "Heidi, don't you think this garment should come with a gift certificate for a Brazilian?" --Tim Gunn


Did anyone else notice that when Julie Bowen said "DIY" that a definition appeared on the screen? WHAT? You have designers spouting off about chiffon and quilting and draping and lots of other things that a regular person wouldn't understand (I didn't, before I learned to sew) but you define DIY?! I hope these definitions continue, perhaps they'll give us one for "bad taste" so we can figure out what the heck Nina is always talking about.

Umm...and RED ROBIN is giving the designers the $100,000 prize. I almost fell off the couch laughing at this. I love their food, but a burger covered in pineapple doesn't exactly make me think high fashion. Getting hard up for sponsors PR?

Did you watch last night? Thoughts on this fresh batch of designers?

Thursday, July 24, 2014

Bombshell Swimsuit...plus a rant

Fact: this was one of the most annoying items I've ever sewn
Fact: it was worth it*


I feel a little annoyed with you, Internet. For a year, all I read about swimsuits was that they were OMG SO FUN to make and YES YOU CAN MAKE ONE GIGGLES and SO QUICK AND EASY I MADE MINE WHILE DRINKING A COCKTAIL.

Yeah, no. Andrea's recent post was much more realistic (in true Andrea fashion, of course). I made this suit at least a month ago so I think some of the hate in my love-hate attitude has actually subsided, believe it or not. I'm sure I'll make another swimsuit (more on that in a minute) but my first foray into this world was straight off annoying.


This is the Bombshell swimsuit pattern from Closet Case Files (duh), in a straight size 8. The pattern is drafted for someone who is 5'6" and I'm 5'4", but I believe I'm long-waisted and the fit was just about perfect. The crotch portion could be shortened a little but that's it. I made a few small modifications to the design to avoid being yet another boring black Bombshell (btw, I recommend black for your first suit...black hides all sewing sins!!). I bought a bikini top to rip apart and steal the cups, and I decided to steal the straps/rings and some braided trim as well.

Part of why it took me so long to blog this suit is because I really did not want photos from my kitchen...but you try taking self-portraits near water while wrangling a 2 year old. Oh, and without getting other people's kids in the shot. Sorry. But as proof that this suit has seen water, here are some not-so sneaky photos from my phone.


First: construction was a pain in the ass. If sewing together three layers (two of them gathered) of nylon-spandex with a quarter inch seam allowance sounds like fun, then you have my pity. It wasn't fun. Also not fun, sewing quarter inch elastic around the curves of the bust and somehow not stretching the fabric. Oh, and did I mention this was with a zig-zag stitch? Shoot me.


Second: it was NOT a fast sew. It took just as long as any other "normal" project (maybe five days of sewing? which for me is usually 1-2 hours/day). To be fair, there was a lot of unpicking on my part because I basted with white serger thread...which showed on the outside. STOOOOPID!


Third: I frequently had to switch between the sewalong and the instructions. Not a HUGE deal because I had the instructions in my Dropbox on my iPad, which can obviously then switch over to Safari. But it still kind of bugged me. Perhaps I was being too careful and making sure I didn't miss anything. Oh wait...I did miss something.


Don't cut out this dart. I cut one side and then was like...uhhhh...that's not right. I managed to still sew the dart with one side cut, but I know that Shanni did the same thing, so it's not just me.

Overexposed to show detail

*So was it worth it? Yes, I think so. It's a pattern that looks good on everyone, which is well-nigh impossible! This is definitely a time when sewing something myself was much more in the budget than buying. I hadn't bought a swimsuit since a trip to Gulf Shores five years ago, and it was a cute little Victoria's Secret number that's completely worthless for actual swimming. Now that I have a child, it's nice to have a suit that feels appropriate for my lifestyle.

Braided trim on center-front

But to continue my contrary nature in this post, it's almost TOO much coverage for me. The front bodice is 3 layers, so it feels very heavy, especially when wet. You need all those layers because of the clever way it's constructed, with a crotch portion and a longer "skirt" portion, but I'd be lying if I said it makes me feel unencumbered.

Here's the thing. I know that lots of ladies have made this suit and they are thrilled with how it makes them feel when they wear it. I get it. Their enthusiasm is contagious. But for ME, I don't need that much swimsuit, even though I think I look pretty good in these photos. My "problem area" is not my stomach. I don't mind showing it off. My thighs? Different story. My boobs? I'd like them to be contained, please. And I knew that before I went to all this trouble to make this suit.

I'm glad I bought the pattern. I have hacks and mods planned and now feel confident in making them happen (well, maybe not confident, but at least slightly experienced!). Want to see?


This is more ME. A bikini, but with a short that covers my way too white and not-toned thighs ("not-toned" sounds better than "flabby" right?). My black suit was always meant as a muslin (I got all the fabric from the remnant bin at Jo-Ann's, I think in total I spent less than $10 on the suit) before cutting into this beautiful fabric from The Fabric Fairy:


I think it will work well with my sketch, better than the Bombshell because I don't want to gather it and lose the beauty of the print. I hope this photo does proper justice to this fabric...it's gorgeous.

And because I don't know where to stick this information in this too-long post, I also made a bikini top as soon as I finished my full suit. I have a black skirt bottom to pair this with and I wanted to see how the triangle top would work out.


As you can see, I crossed the triangles. I was not comfortable otherwise, although the coverage on the side is great. The band piece is 1 inch elastic. In the back I used the closure from the upcycled bikini top.


Not having any more cups, I took Lauren's advice and sewed in an extra layer of lining (I even used the fabric from the upcycled bikini top). I've also worn this one and was much happier with a bikini version, although my elastic got abused the first time I washed it and I don't know how long it will hold out (now won't that be embarrassing?).


Can you make a swimsuit? Sure. If you have a LOT of patience with yourself, and be honest about what you need from a pattern before you buy. Want to design your own? BurdaStyle just released an inexpensive swimsuit sloper, which would be super fun to have, I think.

Your thoughts on swimsuit making? Am I being a big baby, or is it truly harder than everyone is making it seem?

Today is the last day to save 20% on A Sewist's Notebook. Use code HAMMOCK14 at checkout.

Wednesday, July 23, 2014

Project Runway preview, continued

Welcome back to part two of my Project Runway season 13 preview! I forgot to mention this last week, but commentor Amy reminded me: in addition to these designers, there will be a "Runway Redemption" contestant brought back from an old season. It will be either Alexander, Amanda, or Ken. If those are my only choices then I'd pick Alexander. I think he was eliminated right before Fashion Week though he deserved to go.

But let's finish off the facts and figures about the rest of the cast!

Kini--Lots of education and experience. He comes from Hawaii so he likely has a different perspective than all the NYC designers. He makes the second designer to list Craigslist as a favorite website (what?!). Has done a lot of cool stuff with denim.

Korina--All designer and not so much workmanship. Anya proved that this is a combination that CAN work...but that depends on your aesthetic. If you're not making maxi dresses every week than you probably can't get by on ideas alone. A lot of her work is asymmetrical, which drives me bonkers.

Kristine--Now this girl I like! Although her work is a bit crazy. Seems realistic about fashion as a business, but that doesn't limit her creatively. And THIS: Fashion must? Fashion as a style: Wear what you are confident about and what expresses your true self.

The Mitchell Perry--Okay, I wanted to dislike this guy because of how he phrases his name (apparently the domain name mitchellperry.com was already taken), but he won me over with one of his responses to the online Q&A. In case you've never read one of those, the producers always ask the designers what they would design for Michelle Obama. After all these years, I'm so tired of this question. The Mitchel Perry responded with a similar sentiment, that he wouldn't necessarily want to design for her. THANK YOU!

Nzinga--Uh oh, she lists estimating time for garment completion as a weakness. Her designs are very soft and pretty, which always goes over well with the judges. As long as she doesn't get too ambitious with a zillion yards of pleating!

Samantha--It took my approximately 30 seconds to read her entire Q&A, that's how brief she was. Her portfolio was a strange mix of torture devices and easy separates. The only remotely unique thing she said was that she hates open shower curtains. So...there's that.

Sandhya--Watched PR from her native India for years, but only recently could apply due to moving to the states. I respect that a lot, since many contestants don't even watch the show, which irks me. Some of her fabric choices were so colorful that it was hard to make sense of the style lines.

Sean--He lists Uggs as his most-hated fashion faux pas, so we can be best friends. All of the photos in his online bio are of menswear...I hope someone mentioned to him that this show primarily designs for women? Also, he's from New Zealand, so I probably will be so busy listening to his accent that he could design a paper sack and I'd want him to be safe.

Tim--His mom taught him to sew. He says that when he was a kid, if he didn't like his hand-me-downs he was told to alter them to his liking. Ha! Sadly, he has a vest obsession. I hope it doesn't show up in all his designs. His background is mostly in tailoring, so I worry for him if there's an eveningwear challenge.


Between the first batch and this group, does anybody stand out to you? If I have to make a prediction (and you all demanded one, right?) then I'd guess Angela will be first out (or maybe Fäde), and my guess for a winner will be Carrie or Emmanuel. Project Runway premieres Thursday night at 9pm/est, and I'll be there with a glass of vino! Check back Friday for the first episode recap!

Newsletter sign up

.