Wednesday, March 27, 2019

Sewing Room Tour

When it came time for our family of five to upgrade homes, a sewing space was a high priority. We knew we needed either a four bedroom home, or three bedrooms with a basement. I am incredibly lucky that my husband supports my love of sewing, and that he agreed I needed a good space to work. This house is perfect for a lot of reasons, a big one being my new sewing room!


The layout of our house is a bit unusual. We have a lofted area accessible by a spiral staircase (really). The loft contains one bedroom, an attic storage space, and a small landing. We have a baby gate across the bottom of the stairs to keep the kids out, which means the sewing area is off limits without a grown up.

I carried every stick of furniture up those stairs

Painting this room was my first priority when we moved. In fact, it’s the only room we painted.

Listing photo

After painting (temporary
sewing station!)

Given free creative reign, I chose pink! It’s bright, cheery, and makes me happy. The color is Rosy Outlook from Sherwin-Williams. I can’t say I recommend the paint, but the color is beautiful. There are actually pink flecks in the predominately blue carpet, which perfectly match the walls.


After settling on pink walls, I chose a specific color scheme for the room and have stuck to it almost religiously. The colors are pink, gold, black, and white. If there was a piece I had to have that didn't fit these colors, I spray painted it either gold or white (the cork boards below were spray painted on the edges).


The furniture is almost exclusively from Ikea. The one exception is the black and white chair, which was bought second-hand and reupholstered by myself. (Full source list at the end of the post.) The only piece I had before we moved in was the Expedit cube shelf/desk. It was a Craigslist find many years ago and we nabbed it for the super low price of $80 or something crazy like that. If you followed me before our move then you might be wondering about the Espresso colored Expedit I used to have...this is it! This particular style is no longer sold by Ikea, and I knew I couldn't wait forever to find another good deal on Craigslist just for a white version. I made the absolutely ludicrous decision to paint it white. Since we had to disassemble the shelf to move it, it made sense to paint it after the move and before putting it back together.


It. Took. Forever. It was such a terrible project. I followed this tutorial on Pinterest for painting laminate Ikea furniture. The primer from the tutorial was recommended over and over for laminate but it was such a pain. It was very runny and when it dried, it flaked into a million tiny pieces. I am incredibly lucky that I had basically an empty room to use for painting. My supplies were all over the place and I could work in small increments as I had time. And it took a lot of time. I'm going to skip to the end of this painful memory and tell you that I'm happy it's done, but I will never do it again and I can't really recommend it as the results aren't stellar.


ANYWAY. With the now-white Expedit as the anchor piece, I was able to plan the rest of the layout. There was a lot of measuring and browsing Ikea and remeasuring. I knew I wanted three machines out at once, a pressing station, and pattern storage. I tried to be very conscious of how I could most efficiently use my space.


One spot I had to work around was an exterior door that leads to a balcony. I don't spend much time out there since I'm rarely without children, but I didn't want to block the door. I've been told that two owners back, a painter lived here, and she's the one who painted faux woodgrain and hinges on it (our garage door has the same).


I also had to plan around a very large closet with double mirrored sliding doors. The mirrored doors are AMAZING to have in a sewing room, I'm not sure I ever would have thought of it and I'm so glad they were already here. The closet holds all the random ugly stuff that I want easily accessible, but out of sight. The ironing board is stored here, along with printed patterns that I don't think I'll ever use again. The pressing station has a small pad that I made myself, which I use most often instead of the big ironing board. Bonus: it matches the chair I upholstered!


Ikea allows you to buy table tops separately from legs or drawers so you can get just what you want. I ended up putting a drawer set and one leg under the Expedit desk instead of the piece that came with it. That's the beauty of buying everything from Ikea, it all works together. I absolutely love having the drawer set under the cutting board, there's plenty of storage here.


After putting in all the furniture, it was a slow build to finish the space with everything you see on the walls. There was a lot of trial and error, experiments, and daydreaming, but each piece was carefully chosen and sparks joy for me.


If you had asked me a few years ago, I never would've thought I'd end up with such a beautiful, amazing space. We've been in this home ten months and I'm still pinching myself. I wish everyone could have what I have!


I've tried to list everything I could in this source list, but please comment if there's something I forgot! Please note, Amazon links are affiliate links.


four drawer sets: Ikea Alex
gold/white lamp: Lowe's
gold jar with lid: Michael's
black/gold tape dispenser: Target (similar)
corner desk: Ikea Linnmon with Godvin legs (there are two legs that fit into the pre-drilled holes of the Linnmon tabletops, these are the heavier duty ones and I prefer these)
black and white chair: thrifted, reupholstered with fabric from Jo-Ann's
small white vase: Hobby Lobby
macrame hanging: made by me, supplies from Jo-Ann's
pegboard: Ikea Skadis+accessories
picture ledge: Ikea Mosslanda
succulents: Hobby Lobby (one on shelf in white pot), Amazon (loose ones)
succulent vases: Micheals, spray-painted white
succulent with face: TJ Maxx
wall succulents: Amazon
letterboard: Amazon
hanging succulent holder: Target
clock: Ikea Stomma
desk: Ikea Linnmon with Godvin legs
white desk chair: Ikea Snille
trash can: old, possibly Target
photo holder: super old, possibly Target
Moonrise Kingdom artwork: Arthur's Plaid Pants
The Office artwork: gift
hanging pattern holding bar: Ikea Fintorp (this exact style seems to be discontinued)
rolled pattern holder: Amazon
cube shelf/desk: Ikea Expedit (discontinued), painted white; now called a Kallax
storage boxes: Ikea Tjena
magazine storage box: Ikea Tjena
pressing table desk: Ikea Linnmon with Godvin legs
pink lamp: gift
pegboard: Ikea Skadis+accessories
white wall shelf: from previous owner
painting: done by me
cork boards: Ikea Vaggis spray painted gold
sewing caddy: vintage, gift

Wednesday, March 20, 2019

Style Arc Ariana Woven Dress

One of my Make 9 items for this year was the Style Arc Ariana Woven Dress. When this pattern dropped last year, I was immediately drawn to it, which surprised me. I don't wear many wovens, especially dresses. But it was one of those patterns that stuck in my mind, so I decided to add it to my Make 9. I have two near and dear fabrics that I plan to use, but before diving in with those I wanted to make a muslin. So here it is!


The bodice of this dress is fully lined, with a back panel that it shirred with elastic thread. The straps are narrow and the skirt is gathered into the bodice. There are roomy patch pockets on the skirt. The dress is fastened with buttons up the entire front. You can make a crop top instead of a dress by simply hemming the top.


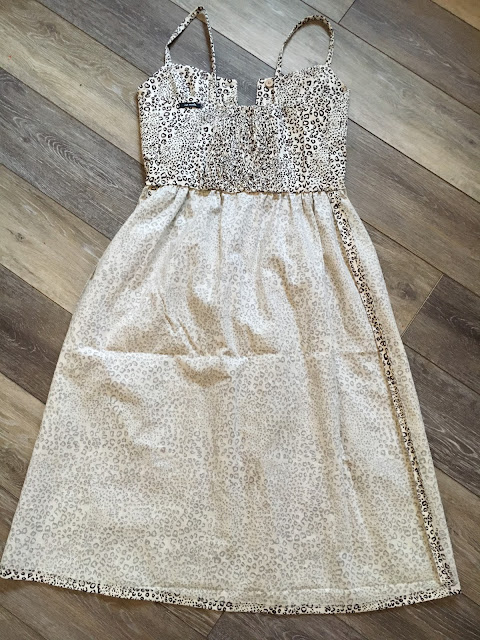
I rifled through my stash looking for a linen-weight woven to muslin at least the bodice, and ran across this yardage of leopard print linen. I had 2-3 yards (tbh didn't measure) and I can't for the life of me remember what I thought I might do with it. I vaguely recall buying it at Jo-Ann's many years ago, but I almost never buy so much yardage on a whim. Whatever my original plans were, I'm so glad it hung around because it was perfect for my wearable muslin!


My bust measurement is 33", which put me between a 6 and an 8. My waist was between an 8 and 10 and my hips were a 10. I made an 8. I cut just one layer of the bodice pieces, and the straps, for fitting purposes. You do need to create the entire shirred panel piece to properly fit the bodice. It is cut twice as tall as you need it, and then it is folded down in half, and further secured with 1/4" elastic in a casing at the top of the panel. Note: shirring is annoying and takes a metric crap top of elastic thread. I ran out of my small Gutermann spool right away and had to order a giant roll on Amazon.


I basted the bodice and pinned the center front closed. I was pretty happy with the fit everywhere but over the bust along the princess seam, and ended up decreasing the cup size in the top portion of the dress. I would say the dress is drafted for someone who is perkier than I am ;) I'm wearing a strapless bra in these photos, but I will say that I think I could get away with nothing at all. The bodice is nicely fit (now) and the ribcage is tight enough to avoid sagging.


Once I had my princess seam changes noted on my pattern pieces, I went ahead and cut out the second layer/lining. I thought that I might just make a crop top, but since I had so much yardage I went ahead and made the skirt as well. I made no changes to this skirt, but for the next one I will remove 2". I am 5'4" and even though I can't find it noted anywhere, I'm making a giant assumption that the pattern is drafted for 5'6". I might do something differently with the buttons...I like the placement on the top but they feel too close together on the skirt and end kind of high.


Now for the directions...I don't think it's a secret that Style Arc instructions are brief. Per usual, there was one page of written text and one page of diagrams. Seam finishes are rarely mentioned although you need them here. With linens that fray a lot, you'd be best off serging all the edges of your pattern pieces from the outset. There were a few instances when the directions didn't seem to make sense, or when a different method would be better/neater. I ended up following Sewing Like Mad's method, which is clear as mud for someone who doesn't have the pattern and a half-constructed bodice in front of them. But I am here to say that it works, and you will end up with a fully-lined bodice with no exposed seams. The only thing I didn't see in her post was about attaching the skirt neatly. I ended up sewing it to the outer layer of the bodice, then turning the inner layer under and sewing it down by hand. You could stitch in the ditch at the waistline, but I'm not super skilled at that and got a better result by hand.


I also ignored the directions for the straps, which seemed to be saying to fold the raw edges under once and topstitch them down. Instead I sewed them into a tube and turned them. I also ended up shortening them by 2".


The pattern is drafted excellently and all notches matched. Style Arc includes seam allowance markings on their pieces, so you never have to go searching for that information. I always feel a sense of relief when I sew their patterns, they've never let me down and it's clear they know what they're doing. The only "mistake" I'd say they make is by not telling you to interface the front portion of the skirt where the buttons are. There is a pattern piece for the front bodice interfacing, but you also need to interface the skirt. It's just a rectangle so maybe I missed that somewhere, but I'll interface that part next time.


I LOVE this dress so much. It's so different from anything else in my closet and I can see myself with the two additional ones I've planned. The shirring is a total pain in the balls (so is 12 buttons/buttonholes), but the results are worth it.


Thursday, March 14, 2019

Winslow Culottes and Ogden Cami

Every now and then (okay, most of the time) I get a little obsessed with an idea. Sometimes one pattern, sometimes a hack, sometimes recreating something I saw in RTW. Most recently, it's been the combination of Winslow Culottes and Ogden Camis. This combo is all over IG, and although it's not my normal silhouette, I've been desperate to try it. And now I have!


I'm usually a tank top and shorts kind of gal. I'm going to be honest though, I'm super bored with that look. My kids are still little, but they aren't projecting-fluids-every-second little any more. I have the mental space for clothes that are just a bit nicer, as long as I can still move and be comfortable. Opposite of that idea though, I am wearing a strapless bra in these photos (this one, from Amazon, which is easily the weirdest-looking garment I own).


Let's start with the top, because it's easy. This is my second Ogden Cami. The only change I made from the first one is to grade the hips out to a 6 instead of an 8. Next time, I'll probably take that in again to a 4 (the bust is a 2 and I did lengthen 1" from the pattern). I feel like this one is a smidge too blouse-y, especially for tucking into pants. The fabric is a rayon challis from Style Maker Fabrics and it is so good. They have a ton of amazing choices for Ogdens. I struggle with prints, so when I find one that works for me I fall pretty hard for it. I used French seams for the sides but finished the bottom edge of the facings with my serger.


Now on to the pants! I've been a culottes lover for a long time, even drafting my own knit versions many years ago. I liked the amount of options in this pattern. There are four lengths and also quite a few hacks on the Helen's Closet blog for other mods. One of those hacks is for back elastic in the waistband, which is what I've done here.


I attempted to make the pattern as-written, with an invisible zipper in the back. But I could not get the waistband eased into the top of the pants, no matter what I tried. It is not a shaped waistband and it is interfaced. None of my normal tricks works. I even tried gathering the entire top of the pant to fit it into the waistband and that looked terrible. I can't see any universe where I will attempt it again, even though I would make the pattern again. Either the waistband will be shaped, or I won't interface it, or I'll cut it longer (or the pants smaller).


To make a version with elastic in the back, you need a longer waistband. I had used almost every last scrap just cutting the culottes, and was super lucky to find one long-ish piece left. I still had to piece it together, and then piece it again to the front waistband, cut down from my original. So these pants definitely earned their label.


I measured a size 8 in the hips and a size 6 in the waist. The directions stated to go with your waist measurement, and I find that to be good advice. I made a straight size 6 and still feel like there is perhaps a bit of extra volume in the hips. Maybe if I cut a 4 in the pant it would fit into a 6 waistband??


I did remove 2" from the length. This was 100% to save fabric but it ended up being correct for my height anyway. I'm 5'4" and the pattern is drafted for 5'6". I made view C. Length is very easy to modify as the side seams are straight down under the pockets.

NOW THIS FABRIC! It is an olive rayon/linen blend from La Mercerie. They call it Avery Slub Linen and it is in my top five favorite pieces of fabric I've ever put my hands on. Possibly top three. It is incredibly soft, with amazing drape, but not too shifty. Fraying was at a minimum and it is mostly opaque. I have always been a knits girl, but after finishing these pants I've been dreaming of an entire wardrobe made from this fabric. AND it comes in a ton of colors! I have the Charcoal on deck for a dress, and I'm just looking for an excuse to order more colors. GO. BUY. IT. Do note, though, it is only 51" wide, which is kind of a weird number. I actually emailed Helen's Closet to ask if I could fit Winslow's on that width. I used 2 yards for mine but if I were taller or wanted a longer view, I would've needed more fabric. I also had to do some weird fussy cutting to be able to have pockets.


All my dreams have come true with my Ogden+Winslow combo, but I want to wear these pants all spring, so I've been trying other tops too. I looooove it with this tshirt (from Target, free from a friend!) tied into a knot. It's a super simple tee, just like the half a dozen Unions in my closet, and I tied a basic knot. Somehow it pulls the look together and is so much better than a sloppy tshirt and shorts.


I wore this outfit outside for hours, chasing kiddos and dogs on our first 70 degree day. It was comfortable, breezy, and great for a warm spring. I expect it to be on high rotation!

Newsletter sign up

.