Showing posts with label swimwear. Show all posts

Wednesday, June 22, 2022

5 out of 4 Kids' Classic Swimsuit Sewing Pattern

This post contains affiliate links.

I hope you're lucky enough to be reading this from a part of the world that is NOT going through the same heat wave as the Midwest. Temps have been hitting 100 this week without even factoring in our extra special humidity. Blech.

We recently purchased a membership to our county YMCA, which means we've been able to beat the heat by escaping to their indoor pool. Swimming multiple times a week is a new thing for us, and it meant my kids needed more swimsuits (oh darn...j/k! I love making swimsuits!)

5 out of 4 Kids' Classic Swimsuit

I have long been on the hunt for a TNT girls swimsuit pattern. Last year I had some epic failures with the Megan Nielsen Mini Cottesloe (weird, because the adult version was a big success). I've been sewing for 10 years but somehow haven't landed on a TNT...until now!

This is the 5 Out Of 4 Patterns Kids' Classic Swimsuit (sold alone or you can get it in a bundle with the women's suit as well). There are extra frills included (this IS a 5oo4 pattern after all!) but I wanted to try it out plain Jane and see how it went. 

I made two suits, one for my skinny 7 year old, and one for my chunkier almost 6 year old. Their measurements were sort of all over (the 7 year old's waist measurement put her at a size 3), but this particular pattern included a measurement I'd never seen before--girth. In this case, "girth" referred to the distance from the point of the shoulder, down the front of the body, between the legs, and up the back to the shoulder again. 

Length and girth for both girls corresponded to their straight sizes, so I ended up cutting a 6 for the 6 year old and a 7 for the 7 year old. I made no adjustments to the 6 year old's suit, but for the 7 year old's I did have to take in the side seams. That was a change consistent with her measurements, so I wasn't mad at it. After that change, the fit was perfect.

5 out of 4 Kids' Classic Swimsuit

The 6 year old's suit...well...notice she's not pictured here. *I* think her suit fit great, but she threw a total fit the second she put it on, saying it was too tight. When I compared it with her RTW suit that she likes, my suit wasn't smaller, but the elastic in the legs was definitely tighter. If you have a picky kiddo, you may need looser elastic than what the pattern recommends.

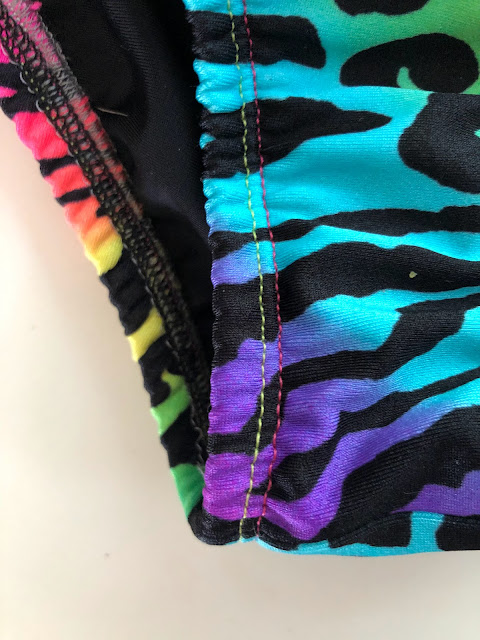
I used a variety of bright threads for the topstitching

Aside from the fit, the reason this jumped to the top of my faves list is the construction. It's drafted so that you do NOT have to use binding on the openings. There are directions for binding if you WANT to go that route, but I have NEVER been able to make swim binding look good. It always ends up wavy, or far too stretched out.

I loved being able to sew the elastic to the raw edges (outer+lining) and then simply turning it under and topstitching. I used my coverstitch for topstitching and my serger for construction. If you are going to make a swimsuit without a serger (totally possible!) this pattern would be a good candidate. The seam allowances are 3/8", so not too narrow to deal with on a regular sewing machine.

This amazing rainbow "zepard" print swim is from The Fabric Fairy (unfortunately it's sold out!). I also used this black swim for the lining, it's nice and thick and could easily do as an outer fabric too. Follow The Fabric Fairy on Facebook or Instagram to be notified first about new fabrics, sometimes great prints like this one sell out quickly!

I'm so happy I have a girls' swimsuit sewing pattern that I can turn to with confidence! I'm sure I'll be grabbing it again for my 10 year old, especially since it comes with a shelf bra option in the upper sizes.

Grab your Kids' Classic Swimsuit pattern and let me know how it works out for you!


I received this pattern for free as part of the 5 Out of 4 Patterns Promo Team. All views are my own, I truly do love this pattern! I received the fabric for free as part of The Fabric Fairy Promo Team, though I was purchasing fabric from them long before I joined the team!

Monday, March 21, 2022

Best Women's Swimwear Sewing Patterns

Today we're talking about one of my favorite things...sewing swimwear!! I know, I know, probably an intimidating topic for a lot of sewists, but I swear it can be learned! Anything is figure-out-able, I promise. If you need some help, there is a swim sewalong happening right now in the Fabric Fairy Facebook group. As part of the sewalong, I'm highlighting some of my favorite women's swimsuit patterns (I've made a lot!).

Cottesloe by Megan Nielsen


I normally don't gravitate to one-piece suits, but you can't beat the Cottesloe for a great, basic suit. And of course, there are bikini options too. If you've never made a swimsuit before, or if you've struggled with the correct length of elastic, I recommend this pattern. It gives exact lengths for everything. One word of warning that applies to all one-piece suits: make a quick mock up with your lining fabric. Torso length varies wildly!

The suit pictured above is actually reversible, and you can find more details here.

North Shore by Greenstyle Creations


Dare I make a wild statement and say I have a TNT swim pattern?? If I do, it's definitely the North Shore. There are TONS of options in this pattern to prevent you from getting bored. The bottoms can be made in different rises. The tops can have a variety of backs. So. Many Choices! But the directions are also great for beginners.

Butterfly suit, purple suit, stained glass suit.

Soma Swimsuit by Papercut Patterns


I'm sad to put this on the list, not because I don't love it, but because it appears to be out of print?! I'm including it anyway, on the off chance it gets reprinted soon (I hope!). I love swimwear with interesting lines, and the cute little triangles at the top of the bikini always get me. This pattern is a little more advanced but is fun to make and wear.

Edgewater Avenue

Okay so I'm cheating here. This is actually a pattern company, not a single pattern, but they only make swim patterns! I had totally forgotten about them, so I wanted to highlight them here. I love that they sell bikini tops and bottoms separately, so you can mix and match what you like. There are real life photos on all the listings so you can see the finished suits on many body types.

I'll admit, I've gotten a little addicted to these patterns! I've made a one piece and two bikinis in the last month. Yes, I am prepping for a trip to Hawaii, but that's still a lot of suits! I recommend watching their YouTube video on making a reversible suit before you dive in, as most of their patterns follow this method.


There you have it, a few of my favorite swimsuit sewing patterns! Don't be discouraged if you haven't found your swim BFF pattern yet. It takes a LOT of practice to get good at sewing swimsuits, but the flip side is that the stretch can make fit forgiving. Join us over in the Fabric Fairy Facebook group for more fun!


I am a member of the Fabric Fairy Promo Team and received some of this fabric for free in exchange for a review. Being on the promo team is an easy job because all the fabrics are fantastic! All opinions are my own.

Thursday, May 14, 2020

North Shore Swimsuit

How many swimsuits does one land-locked Midwesterner need? Don't answer that.


The theme for May's Fabric Fairy Promo team is "self-care". To me, that means "sew stuff you like". I LOVE making swimsuits. I have way more than anyone "needs". Somewhere along the way I had to give myself permission to sew them because I like it, not because I need them. I try to limit myself to one per year, but that usually turns into two or three #sorrynotsorry


This year, I went with a new pattern, the North Shore Swimsuit from Greenstyle Creations. There are a TON of options in this pattern, I won't even try to list them. I've had a similar swimsuit pinned for a century and the North Shore seemed like the closest match I could find. I made the Deep V Full Cup Front, with a Pullover U Back. I cut the mid-rise bottoms but used wider elastic, so mine are not a great representation of the accurate mid-rise. My bust is 33" and I made the top in XS. My hips are 38" and I started with a medium, but they were too big. I cut them down to a small and they fit great.


This print is called Abstract Monarch. The last two years, my kids and I have raised monarch butterflies. It's fun and this suit reminds me of that. I like how it's abstract though, you might not know it's an homage to monarchs at first glance. I completely forgot to order any lining fabric, so I made due with some black and green solids leftover from last year's swimsuits (here and here). Construction was done with my sewing machine and I topstitched the elastic with my coverstitch.


I ordered my swim elastic from The Fabric Fairy as well. This was my first time trying "rubber swim elastic". It was a lot like sewing a rubber band. I'm not sure if that's a good or bad thing! We'll see how it holds up over time, but I did think it felt sturdier than the Dritz stuff I usually buy at Jo-Ann's.


I think this suit is super cute and turned out how I envisioned. The pattern directions were great and I could even recommend this as a first-time swim project. Now if we could get the leak in our hot tub fixed...

Tuesday, July 16, 2019

Reversible Cottesloe Swimsuit

Reversible Swimsuit!? What? Yes, it’s true. Just when you thought I didn’t need any more swimsuits, now I have two in one!


When I was a kid, I had a swimsuit that was reversible. It was all black on one side and all white on the other. I thought it was so awesome that I could pack one suit, take it to camp for a week, and essentially have two suits. Probably no one noticed. But it was still my favorite anyway.


A few months ago, The Fabric Fairy expanded their team of sewists and I was one of the lucky ones they picked. If you’ve been reading long at all, you know TFF is hands-down my number one choice for swim fabrics. I’ve also used their French terry, jersey, etc. over the years. When it came time to choose fabric for my first Fabric Fairy project, I tried desperately to avoid more swimwear. How many suits does one person need?? I usually make one every year, and I’d already done that! But I’m like a helpless baby. Especially when I hit on the idea to make a reversible suit!


One side of the suit is this Supernatural Nylon Spandex Swim. The other is Classic Black Nylon Spandex Swim. Pro tip: when in doubt about the success of a swimsuit, use black. Any wonky stitching will disappear. I adore the print, but let me tell you, the black is one of the highest quality swim knits I’ve ever used. Highly recommend!


The pattern I used for this suit is the Megan Nielsen Cottesloe. As far as I know, this is the first MN patten I’ve used. True story, I’m in love with this pattern. Lately, I’ve developed an intense bond with super simple patterns done really well, and the Cottesloe falls into that category. The cut is perfect.


My measurements put me at a size 2-8-8. The last time I tried to make a one piece suit, it ended up too short in the torso and got chopped into a two piece. Given my drastic grading and past issues with one pieces, I made a quick muslin of the Cottesloe. It fit, but after comparing the stretch of my muslin and final fabric, I decided to add 1/2” of length to the bodice. I have a long torso and this is a common adjustment. Especially considering that I have two different fabrics stretching together, I'm really glad I added the extra length. The fit is amazing! My muslin was the low-back version, but it felt like my shoulder straps could easily get pulled off, so I went with View B.


I went with the Cottesloe because of its simplicity, which is necessary for a reversible suit. The pattern simply has elastic sewn to the edges and then turned down. To make it reversible, instead the edges are finished in the same way you would use double-fold bias tape, except that there is also elastic inside. I chose a solid black and a black and white print so that I could use one of them as the binding, and it would work with both fabrics.


To make a reversible swimsuit, cut a front and back from both fabrics. Construct them as usual and then insert one into the other, WRONG sides together.


The seam allowance on the Cottesloe is 1/4" (side note--I generally hate this SA on a swimsuit. 3/8" is much easier to work with and where I am 3/8" swim elastic is easier to find). The method I used means that the finished edge of the suit will be the same as the cut edge. So, the seam allowance needed to be removed for the suit to fit as intended. The easiest way to do this is to serge your pieces together along all the openings, cutting off 1/4". That way, you can both baste your pieces AND remove the seam allowance in one quick pass. I was pretty lazy with my suit and I only did this step on the leg openings. It didn't matter to me if the other openings were slightly larger, but nobody wants an extra-large crotch amiright? Additionally, I did use 3/8" elastic instead of 1/4" as directed, so it came out smaller anyway. Too much maths.


Next, I used a flexible ruler to measure the length of the openings. I cut 2" fabric strips in this length. The Cottesloe gives tons of details on lengths for the elastic but I have enough experience with swimwear that I can figure it out by feel. If you do not, then use the pattern measurements, or the length of the opening minus a little.


Sew your 2" binding strips along the short ends so that they make a loop. Do the same with your elastic. Quarter and pin in this order: swimsuit right side (either right side) touching binding right side, elastic touching binding wrong side. Go slowly, making sure you're catching all the layers and that they all line up along the raw edges. I used a zig-zag on my regular machine to make sure I didn't screw up this step. Sew straight down the middle of the elastic or to the side furthest from the raw edge. You'll be stretching the binding and elastic slightly to ensure a snug fit.


Next, you will wrap the binding around the elastic to the other side of the suit, tucking the raw edge under and thus covering all the finishings. This is the part that is similar to double-fold bias tape. The difference is that cotton bias tape is easily pressed into submission, and swim knit is not. Be careful not to roll the elastic out of place, or to let the raw edge of the binding slip out. Use lots of Wonderclips if you have them! Topstitch the binding down using a zig-zag stitch. Normally, I would use my coverstitch to topstitch swim, but remember that the stitching will be visible on both sides of the suit. A zig-zag is better in this case. Repeat this process with all of the openings and viola, a swimsuit that is completely finished no matter which side is out!


Questions? Comments? Drop them below!


I received this fabric for free in exchange for a review. I purchased the pattern. All opinions are my own. Affiliate links have been used in this post. Thank you for supporting this blog!

Wednesday, May 1, 2019

Papercut Patterns Palooza Part 3: Soma Swimsuit

Here we are, the last entry in my Papercut Patterns Palooza! You be the judge of whether or not I saved the best for last, because I love my Pinnacle Tops and Pneuma Tanks just as much as my Soma Swimsuits.


Like the other Papercut patterns, the Soma is packed with options. First up is View 2, a "bustier style" with pieces that form cups, and no back closure. I have a 33" bust and made a size XS. I think the fit is okay, but it would be better with an underwire, if I could figure out how to do that. Following Lauren at Lladybird's idea, I used two layers of swim lining for more padding/coverage. I'm not entirely happy with that decision, and if this wasn't a print you would be seeing a lot of wavy seams. It got super bulky.


Speaking of the print, it's amazing! The Fabric Fairy (my FAVE place for swim knits) stocked this Banana Leaves swim knit months ago and I tried to resist it. I told myself I didn't need another swimsuit this season (I already had the neon green swim knit that you'll see in a minute). But when I saw that fateful "Almost Gone!" on the website, I decided I had to have it. But alas, I waited too long, and it had sold out by the time I went to buy it. I frantically emailed Megan, the owner, and begged for any yardage she had left. They don't call her the Fabric Fairy for nothing! Megan let me know she had a 21" piece left and it was mine if I wanted it. I paired it with her suggested solid colored green, called Banana Leaf Green, and used that for the lining.


The instructions for the suit were excellent, although I recommend paying careful attention to your notches in order to properly construct the cups. I did not topstitch the seams because I was afraid of making them even more wavy, and I did follow Lladybird's other piece of advice, to burrito the triangle piece so that all seams would be fully enclosed. I'm not sure why that wasn't part of the directions, except that it was pretty tricky (not impossible).


The other change I made was to use extra straps to make the back look like a Pneuma Tank. I am posting the above photo despite my own hang-ups about how my post-three-kids body looks, because I do want to mention how cheeky the bottoms are. I have a size 38" hip which is between an XS and S so maybe they wouldn't be so skimpy if I had sized up instead of down.


I also wanted to make View 1, and had this neon green swim knit (from Mood) in my stash for a while. Full TMI disclosure: those are *not* my nipples showing through, even though it definitely looks like it. This view has a dart and I just did not get as smooth of a dart as I could have. It looks pointy and not really flattering. I also doubled up with this fabric and I think I should have used a proper swim lining instead, to make it more opaque in general (which is what I did on the bottoms).


I did insert cups into this suit, but once it was finished and I tested it out in our hot tub, it was stupidly obvious that there were cups. The fabric was even more sheer when wet. I ended up unpicking the underbust elastic and pulling out the cups.


Instead of using FOE under the bust, I used a thicker picot elastic. For visual balance, I used the same elastic on the waist of the bottoms, which did essentially raise the rise a touch (because I wasn't folding over and encasing elastic). The cut of the leg is the same, so they're still cheeky, but they are a bit taller. I did end up shortening the strap elastic to perfect the fit, but that will depend on your elastic. There is a sewalong and I believe it was there that I read how you should not over-tighten the straps, because that will cause the top of the triangle piece to collapse and not lay flat. So, it's a tricky part to balance.


I think the style lines on this view are super cool, especially the back, but this particular fabric is kind of a miss. I've generally had better results with swim prints than with solids, unless the solid is black. I think from now on I'll stick to prints, they just hide stuff better.

The fun part is, I still have one more view I could make with this pattern! I wish I needed 100 swimsuits but alas, just hanging out in my hot tub after the kids are in bed doesn't necessitate it. I enjoy making swimsuits and the majority of both of these were made on my regular machine with a zig-zag or three step zig-zag stitch. There is certainly a learning curve, but View 1 of this pattern would be a great intro suit.

Thursday, May 17, 2018

Vintage-Inspired Swimsuit

Disclaimer: I've gotten REALLY good at sucking in my gut for photos. Please remember that pictures on the internet are not reality!!

Somehow I've gone almost a year without blogging last summer's swimsuit! Remember this beauty?


I had both the pattern and the fabric for quite a long time before I finally took the plunge, just before Baby M's first birthday last July. We took her to a pool, so of course I needed a new suit (don't worry, she got a new one too, except it was store bought #momoftheyear). I wore it that one time, and then we didn't swim any more that summer! But this past weekend, it hit 90 degrees and we pulled out the sprinkler and our bag of swimwear.


Obviously, the suit didn't end up as planned. I cut and sewed the lining and tried it on my body to make sure the torso length would work, but I neglected to notice how...cheeky...it looked. There was a lot of swearing and hair-pulling before I ended up cutting the bodice and making a two-piece. I also recut the bottom to be more boy-shorts than bikini. Just a personal preference post-kids.


This AMAZING swim fabric is from The Fabric Fairy. If you aren't buying swim fabric from her, you are doing something wrong. She always has the best and most unique prints. I'm super excited that our new house will have a hot tub, because it means I have an excuse for more swimsuits!


This suit was a real make-it-work moment, but I think it turned out alright in the end. I still get to see that vibrant print, and it would have broken my heart to toss it in the trash after waiting so long to use it.

As for this summer, I do have a neon green Soma on my plate. What about you, are you planning any swimwear?

Thursday, January 26, 2017

Nantucket Swimsuit

My favorite four year old is two weeks away from becoming my favorite five year old, and to celebrate she's having a pool party! Don't worry, it's indoors. But the only swimsuit she had was a cheapo one she's worn twice and the color bled all over it after the first wash. Not exactly birthday party worthy. We (I) decided on an Under the Sea theme, so it felt appropriate to conjure up some sort of Ariel-inspired bathing suit for her.


I've owned the Nantucket Swimsuit pattern for a while but haven't made it before. Now that I'm the mother of three girls, I expect it will get a lot of use. It was pretty easy to hack it into the look that I wanted. I simply colorblocked the top portion, then sewed a basting stitch and gathered the center-front. In retrospect I should have sewed a piece of elastic there, it would have been more stable, but this should do for now. If she pops the stitches I'll go back and add elastic.


The green and purple swim fabric is from Jo-Ann's. The lining is pink milliskin from Girl Charlee, which I bought ages ago. It was damaged by glue during shipping and has retained some wonky stains, so it was perfect for a swimsuit lining where nobody will see it.


I started out using my serger for construction, but I quickly remembered the issue with that. On a swimsuit, the fabric is stretched to the max and my stitches always show through. If someone has a solution, please let me know, but I ended up doing most of the construction and topstitching on my sewing machine. A three-step zig-zag worked way better for topstitching than a regular zig-zag. I would have preferred to use my coverstitch to topstitch but I didn't have matching cone thread. The back binding is suuuuuper wonky, it got stretched and wavy. I started to rip it out, but zig-zag+three layers of swim fabric=a whole lotta nope. It looks worse laying flat than it does when it's on and moving around. I also think it's kind of just the way this pattern is drafted, that low scoop back doesn't look perfectly flat on many tester photos either. Next time I may raise the scoop.

zig-zag

3 step zig-zag

I ended up making a 4T chest size with a 5T length, but did take it in a little bit at the side seams. I also sewed the lining and outer separately and and then basted them WS together so that the seams would be hidden, this was different than the directions and I'm not really sure why. It wouldn't have been much harder. It also gives you a chance to fit it before sewing, you can fit the lining and then work on the outer shell. Other than that, the directions were great, per usual. I promise, anyone with patience can make a swimsuit. This is my fourth or fifth one, I finally tried on my old Bombshell swimsuit the other day, in anticipation of the party. It stills fits great, two babies later and it hides all the lumps without making me feel like a frumpy mom.

Grab your own Nantucket or one of many swim patterns from Peek-a-Boo Pattern Shop. I am an affiliate but my opinion on this pattern is my own, and I purchased it myself.

Newsletter sign up

.