Showing posts with label Anno & Pum Patterns. Show all posts

Wednesday, March 29, 2023

Pattern Hack: Using Trim as a Sleeve

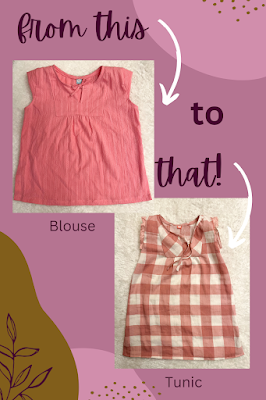
This post is part of a series this month about the Anno and Pum Kids' Peasant Sleeve Top by Apparel Pattern Making. So far, I've shown how you can lengthen a blouse to a tunic, and how to sew French seams with a side seam split. The last hack for this adorable top is to swap the flutter sleeve for a cute pre-made trim sleeve.

How to Use Trim as a Sleeve

As-drafted, the pattern calls for a cap sleeve on the top part of the armscythe, and the bottom part is finished with bias tape. This method replaces the cap sleeve portion with trim, and then finishes the entire armscythe seam allowance with bias tape.


You will need: the cap sleeve pattern piece, the bias tape pattern piece, some ready-made trim and either fabric or bias tape. My trim is vintage and thrifted from a garage sale, but it was the perfect match for this Tencel woven from Jo-Ann's. 

How to Use Trim as a Sleeve

Line the trim up through the center of the pattern, and cut two pieces. 


Before sewing the trim to the bodice, you will need to finish the short ends of the trim. How you do this will depend on the trim, but I just folded mine down and sewed it with a simple hem.


Sew up the bodice until you have the shoulders joined, but before you sew the side seams.


Find the center of the piece of trim and place that on the shoulder sleeve, pinning or clipping it in place right sides together.


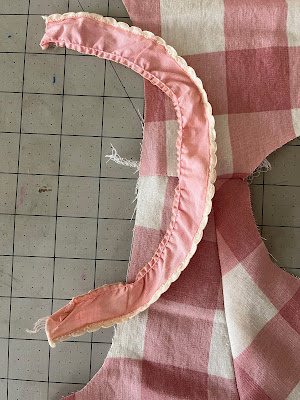
Sew the trim to the opening for the sleeve.


Sew the side seams, using the French seam hack if you want!


The binding for the armscythe seam allowance will need to be cut twice as long as the pattern piece. Right sides together, pin or clip the bias binding to the seam allowance, and sew directly over the previous stitching line from sewing the trim to the armscythe. 


Wrap the bias binding over the seam allowance and sew it down again, making sure you're only catching the seam allowances and binding and not the top itself.


You're done! From the outside, you will not see any stitching around the armscythe. If your seam allowances poke out at all, you can tack them down to the side and/or shoulder seams to keep them from rolling out.


This tunic will be my daughter's Easter outfit this year, and she's so excited about it!


I am a freelancer for Anno and Pum Patterns and received this pattern for free.

Thursday, March 23, 2023

Pattern Hack: Lengthen a Blouse to a Tunic

A great way to add longevity to a kid’s top pattern is to lengthen it into a tunic. Today, I have a tutorial using the Anno and Pum Kid’s Peasant Top sewing pattern to do just that!

Pattern Hack: Lengthen a Blouse to a Tunic

There are two ways to lengthen a garment into a tunic. First, you can add length vertically without changing the width of the hem line. Use this method if it’s your first time pattern hacking, it is easier and faster. It is also suitable if the child you’re sewing for is straight up and down, without much hip width.

Pattern Hack: Lengthen a Blouse to a Tunic
Adding length only


The second method adds length vertically and also adds width to the hem. I am using this method in this tutorial. I am making this top for my 6 year old daughter because she has some hip width that requires extra ease. 


Pattern Hack: Lengthen a Blouse to a Tunic
Adding length and width

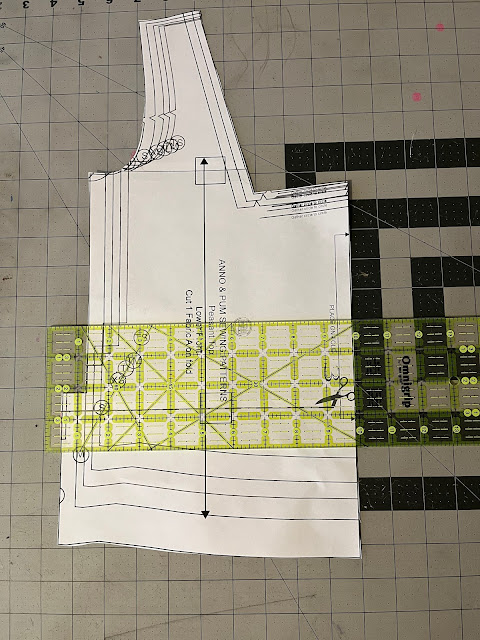
To start, you will need the front and back pattern pieces, and an idea of how much length you would like to add. I am making the 7-8 size and adding 4 inches. I love this Omnigrip ruler that is 4” wide. 


Pattern Hack: Lengthen a Blouse to a Tunic

Select a place that is about mid-way down the pattern piece and place your ruler perpendicular to the center front line . Mine is 5” down from the point of the armscythe (remember this number, as you will repeat the process on the back piece). Draw a line horizontally across the pattern piece.


Repeat the process on the back pattern piece.


Cut along the horizontal lines.


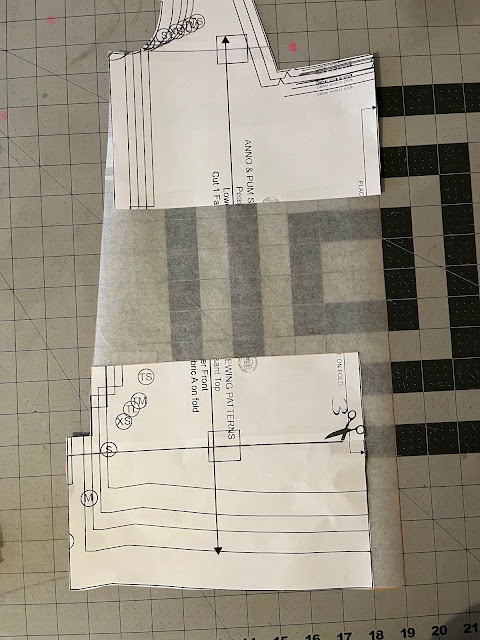
The next steps are much easier if you happen to have a cutting mat with 1” grid squares. Take the top part of your front pattern piece and align it on a vertical and horizontal straight. Next, take the bottom portion of this same pattern piece and move it straight down 4” (again, this is much easier with a grid underneath). Because I am also adding width at the hemline, I moved my pattern piece 1” to the left (away from the center line). If you are not adding width, you will not do this step.


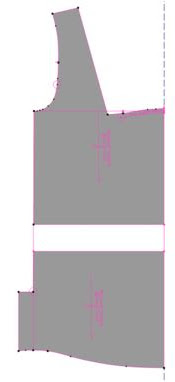
At this point, you will need to fill in the pattern with extra paper. You can lay tracing paper on top and make a totally new piece, or you can put it underneath, tape it together, and draw new lines. I added the vertical center front line, sketched in the 1” of new hemline, and also redrew the side seam.


Use a ruler to draw the new side seam, connecting a point from the end of the armscythe to the hem (this pattern has a split side seam, so my bottom point is just above the split).


Here is my final pattern piece cut out.


Repeat the process for your back piece. Move the bottom part 4” down and 1” over.


Use a ruler to draw the side seam.


Lay your final pattern pieces on top of each other to make sure that the side seams match up in length.


And here are your two final pattern pieces!


Cut your fabric as normal and proceed with your pattern sewing instructions. Your top has now been hacked into a tunic! Your kiddo will enjoy years of wear as they get taller and the tunic is transformed into a top.

Anno and Pum Kid's Peasant Blouse hack
If you like this trim sleeve, stay tuned for that hack next week!

I am a freelancer for Anno and Pum Patterns and received this pattern for free. This post contains affiliate links.

Tuesday, March 14, 2023

How to Sew French Seams with a Side Seam Split

Hello sewists! Today I’m sharing a French seam tutorial, and how to sew it even when your garment has a split in the seam. Typically, this would be on a top, but it could also be on the bottom of pants or even the hem of a skirt. I’ll be demonstrating using the Anno & Pum’s Kid’s Peasant Top sewing pattern in a textured cotton woven. This fabric is originally from Alyssa May Design textiles, but it’s been stash-aged quite a few years.


The ideal pattern for a French seam calls for a lightweight woven fabric, and the seam allowance is at least 1/2”. It can be larger, but not smaller. The pattern I am using has a 1/2” seam allowance.


To start, place your fabric WRONG sides together along the side seam. Sew this seam with a 1/4” seam allowance (or half your SA).
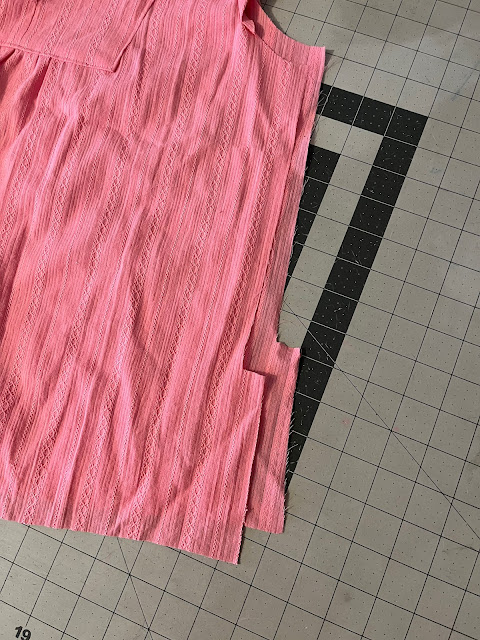

French seam tutorial with a side seam split

Stop your stitching when you get to the extra fabric for the split.


French seam tutorial with a side seam split


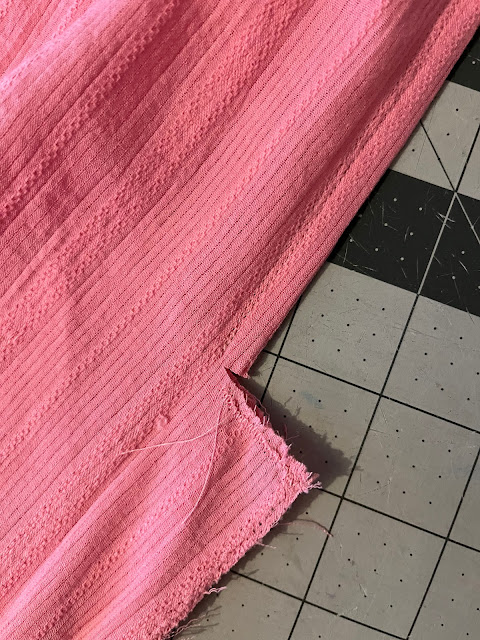
At this point, clip into the seam allowance just up until the end of your line of stitching.
Then, carefully trim the side seam allowance to 1/8”. Do not skip this step! (I do, sometimes, and always regret it!). 


French seam tutorial with a side seam split

Then take your garment and flip it around so it is now RIGHT sides together. Again, sew the line of stitching along the side seam, at a 1/4” seam allowance (or half your SA). This step encloses the raw seam allowance.


French seam tutorial with a side seam split


Again, clip into your seam allowance up to the end of the line of stitching. If your fabric frays heavily, you can sew a few stitches across the raw edge of the French seam, or dab it with a bit of Fray Check.


French seam tutorial with a side seam split


Using your sewing machine and a zig zag stitch, finish the raw edges of the fabric for the split.


Fold the fabric to the wrong side and press. Because you clipped into the SA it should press flat neatly. Continue following the directions to finish the split.


Your French seam side split is now complete! Pat yourself on the back for a job well done. If you are interested in more hacks, specials, and more styles to sew for the Anno and Pum Sewing Patterns, make sure to join their Facebook group

I am a freelancer for Anno and Pum Patterns and received this pattern for free.

Newsletter sign up

.