Wednesday, August 31, 2022

How to Alter a Jeans Waist

When I do alterations for clients, I always tell them that there are two ways to do something--the quick and dirty way, or the right way. They're paying me by the hour, so I give them a choice for how they want me to work. The right way always takes longer. Today, I've got a tutorial on how to alter jeans around the waist, the right way.

How to Alter a Jeans Waist

Full disclosure, I got requests for this tutorial after the fact, so there are not nearly as many photos as I would normally have for a full tutorial. I only snapped a few in progress pictures to make an Instagram Reel. I will explain what I did in as much detail as possible, but if you're a visual learner I apologize!

It's rare for me to buy anything ready to wear, but I make exceptions for fabric types that I can't buy myself. The current style of light-wash mom denim, particularly in a stretch fabric, is nearly impossible to find in yardage. So, I picked up these jeans (second hand) that originally were from American Eagle. They were a size 10 and fit okayish in the hip, but not at all in the waist. I loved the color, and the fabric was super soft since it was a cotton/modal blend (with spandex and a touch of polyester). I decided that for $17 I was willing to take the chance on a full blown, "right way" alteration.

The bulk of this project was seam ripping. Please make sure you're buying fresh seam rippers regularly, because they do go dull! I get mine in bulk from Wawak

How to Alter a Jeans Waist

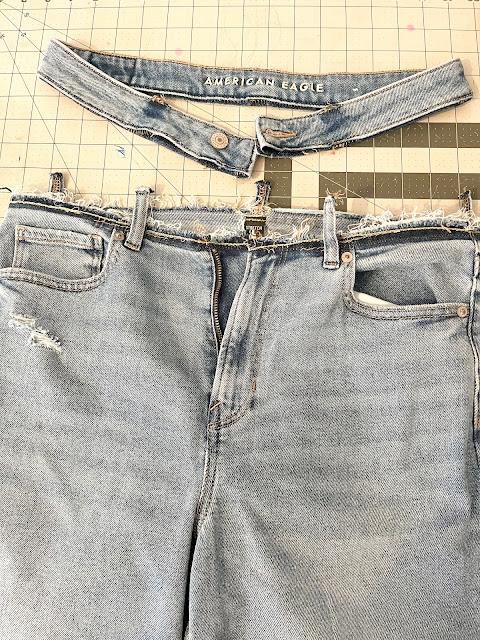
The first step is to remove the waistband. If there is a leather patch on the back, you'll need to take that off. Next, I started picking out the front topstitching near the zipper, and after a few inches the rest pulled away. It was sewn with a chainstitch (here's some info on a chainstitch) which means it was looping and ripped out easily once started. After that, I had to unpick the seam allowance inside the waistband, where it had been sewn to the top of the jeans. Last step on the waistband was to rip out the stitching where the top of the belt loops had been sewn into the waistband. I left the bottom stitching on the belt loops. I did need to completely remove one belt loop at center back, but set it aside for reattaching later.

How to Alter a Jeans Waist

Waistband removed, I could now start working down the vertical seams. First was the topstitching along the side seam, next to the pockets. This stitching is a pain to rip out, it ends in a bartack, but luckily it's short. With the topstitching gone, you can then open up the side seams. On my jeans, the seam allowances on the sides were finished separately, so I did not have to rip any serging.

Next it was time to tackle the center back seam. On jeans, this is typically a flat-felled seam. You will need to rip out the topstitching and then separate the seam. I opted to open this seam all the way to the crotch, although I've also ripped it out halfway in the past. Just depends on how much tailoring you need along the bum.

Now comes the trickiest part, tailoring the pants to fit your body using the newly opened seams. This part is much easier with a helper, but I managed on my own. I put the jeans on and held them where I thought they should sit (hard to do exactly because the waistband is missing). I started pinching out fabric along the side seams and the center back seam to get an idea of how much to remove, and where.

Because I did not want to move the back pockets, I was limited on how much I could take out of the center back, so I started there. You can either pin it, or baste it, or even lay another pair of jeans on top and trace the crotch curve. The most important thing is to line up the topstitching/seams along the yokes. I have a slight swayback, so I ended up taking out a pretty decent chunk starting at the waist and tapering to nothing all the way down at the crotch.

Be kind to yourself, this is a fiddly process and it will take some trial and error!

Once I had the center back seam basted where I wanted it, I moved on to the side seams (already done in the above photo). Again there was trial and error here, but you want to make sure you're working each side evenly. If you don't, the front pockets will end up being two different sizes! Also make sure you don't end up sewing the pockets so small that you can't fit your hand inside.

The annoying part about narrowing the side seams were the pocket rivets. If you look at the photos, they disappear between the before and after. I removed so much that the rivets became a part of the side seams. I had to cut them off and then try to finish the seam allowances neatly.

Once again, I removed a pretty decent chunk from the side seams, starting at the top and tapering to nothing somewhere below the pockets. 

Keep trying the jeans on and making adjustments until you're happy. Sew the seams permanently. On the side seams, I finished the seam allowances with my serger. Then I pressed them to the back and restored the vertical topstitching next to the pockets, just like in the original jeans.

Next, I sewed a faux flat felled seam on the center back. To do that, serge the seam allowances and press them to one side. Topstitch from the outside.

With all your vertical seams restored, it's time to shorten the waistband to fit the smaller opening you've created.

There are a couple ways to shorten a waistband. You could cut it in three places, just like you did with the pants (side seams x2, center back seam). I opted to cut it only at center back. I basically removed the entirety of the embroidered "American Eagle" wording. Once you've chosen where to remove fabric and put new seams, you'll need to slightly open up the waistband topstitching around your cut. You need to be able to put the waistband outer right sides together, AND the waistband inner right sides together, to sew new seam(s). 

Again, trial and error. I pinned the waistband back on in the places where it wasn't cut, then sort of pinched out at the back. You could certainly measure and sew a matching waistband, but again my slight swayback means I sometimes need the waistband to be even narrower than the top of the pants. 

I ended up fixing the waistband with a cheater method. Rather than continuously pinching and sewing and resewing, I tucked one cut end under the other and turned in the raw edge. It got bulky, but a couple whacks with a hammer and the bulk behaved. I was able to hide any imperfections by placing a belt loop over it.

Waistband pinned/basted together, I used the seam allowance from the inner waistband to sew it back onto the pants. Once that was done, I tucked everything neatly into the waistband, pinned well, and sewed topstitching all around the waistband in order to secure everything. This is also a good time to put those belt loops back and secure the tops at the same time that you're topstitching. 

If you want, you can put the leather patch back on. I accidentally ripped mine (it was more like paper than leather) so I didn't put it back.

I am THRILLED with how the alterations turned out on these jeans! It was a lot of work, but I didn't have to cut out fabric, hem, or put in a zipper, so still less work than making them from scratch. Since it's a stretch fabric I don't mind the high waist like I normally do. And they look cute with crop tops!

Questions? Comments? Again, I know there aren't a ton of photos, so ask away if you need help!

Tuesday, August 23, 2022

How to Turn an Image File Into a Sewing Pattern

This post contains affiliate links. Thank you for your support!

Did you know that cut files don't necessarily need a cutting machine? Okay, I'm cheating a little, because obviously certain files are made for those machines. But many cut file designers include PNGs, which are image files that can be printed at home. In other words, they can be used as sewing applique patterns!


This hack is super similar to a previous post, when I shared my tutorial for using cut file designs as embroidery transfers. The concept is the same, but before you get started you need to know that this hack only works with images that are NOT LAYERED on top of one another. Since you will be using the image file instead of the cutting machine file, your printer cannot separate the layers. Let's take a look at my cut file bundle that I made specifically for adding to my free wall banner pattern:


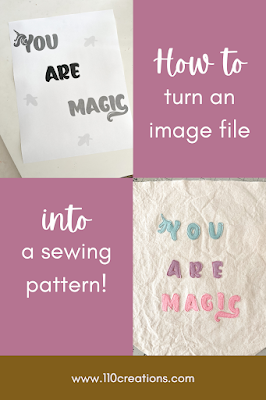
The mushroom image is layered (the fern is on top of the stem, the stem is layered on the cap) and after printing out the image you cannot cut the pieces separately. The "You Are Magic" phrase and stars are split in pieces and will work just fine, as will the rainbow. Of course, if you have a Cricut or Silhouette, you can load the cut files there instead of printing them and it will cut layers.

Using the PNG/image files included with your cut files (check the listing, all of mine in my Etsy shop have PNGs but I imagine some designers do not) follow the directions in my previous tutorial for inserting the image into a Google Doc. If you need to, resize it using the ruler toolbars at the top of the screen. When you're finished, print it out. It doesn't matter if it's in color or not, mine is not because I don't have a color printer.


Now you will need to use your (paper) scissors and carefully cut out the pieces of the image. And now you have an applique pattern!  


Use the cut pieces of paper just like you would a regular sewing pattern. I like this small rotary cutter for intricate work, or my Cricut scissors. I got the tiny mat at Dollar Tree!


I used the You Are Magic design to cut felt. I had a bunch on hand from Gingermelon, leftover from making a doll for my daughter. It's a wool blend and it's SO buttery soft, much nicer than the stuff you can get at big box stores.


After I cut the felt, I secured it to a banner using Wonder Under and my sewing machine. Here's a photo, or you can see a Reel on my Instagram!


My free wall banner sewing pattern is a great blank canvas for a quick gift, and you can combine it with so many digital designs! Sign up for my newsletter and you'll get access to my complete freebie library, including the wall banner pattern. Enjoy!


Thursday, August 18, 2022

Hey June Patterns Union St. Tank

This post contains affiliate links.

Y'alllllllllll I have been waiting for this pattern for, I don't know, 57 years? Definitely feels like it's been missing from my entire life, so that estimate seems right. You only have to hang around here for two seconds before you realize that I am obsessed with the Union St. Tee pattern. Not joking when I say I've made it nearly 30 times. I have tried hacking it into a tank top and it just never worked out. Luckily, Adrianna heard me crying myself to sleep at night in the summer time and delivered my dream tank pattern!

Union St. Tank

The Union St. Tank has all that flowy goodness you love in the Tee, but with no sleeves. The fabric I chose is Hot Pink Bamboo/Spandex jersey from The Fabric Fairy. I love a good hot pink and this one does not disappoint. It was that magical perfect weight where it wasn't too heavy (common with bamboo) but also isn't sheer. I wore it for a hike with my kids and felt completely comfortable.

Union St. Tank
Pants are blogged here

The neck and arm bindings are sewn flat with specific instructions on when and where to apply tension, in order to minimize tunneling along the strap. If you've ever jacked up a tank top binding and ended up with a too-narrow strap (me) you will appreciate this thoughtful approach to the directions. 

I don't love sewing bindings flat though. The directions are wonderful for teaching you how to properly tension the neckband, and you do get more control sewing flat. In fact, the bands are drafted extra long so that you HAVE to sew them flat and cut off the excess. Next time, I might just calculate the right length (roughly 80% of the opening length) and sew them in the round. And then get mad at myself when I ruin the strap, ha!

I made the V-neck version, but unlike the Tee it's sewn with that little dart in the center front. This method is quite common in RTW but I've never been able to do it well. I'll probably stick with the scoop front from now on. I also did not hem and instead tacked down my seams from sewing the binding flat.

Union St. Tank

I do have a tiny beef with this pattern that I think has a reasonable explanation. The measurement chart is not the same between the Tee and the Tank. If you know you're a Small in the Tee and were hoping to make a Small in the Tank, well, hate to break it to you but you can't. The Tank is sized 0-30. The Tee is sized XXS-3X. The charts are totally different. I'm sure the explanation is that the Tank is drafted to fit into a more inclusive range, it fits a more modern chart, whatevs. It's common practice for designers to update their size charts over the years. Just make a mental note that there isn't a sizing shortcut here just because you've made the Tee before.

Union St. Tank
Old version size S Tee under size 4 Tank

For me personally, I'm also still working from the old Union St. Tee, because Adrianna did update it YEARS ago. Right after I bought it. So the Tank was an even further departure from my TNT Union Tee sizing, where I make a Small. In the new Tank, I made a size 4 and I'm happy with it. I could probably size up or down depending on the look I'm after. 

I have an embarrassingly large amount of tank tops (a lot of them the more close-fitting freebie Durango Tank, also from HJ) but I'm still happy to have this one in my rotation!

The Best Fabric for Sewing a T-Shirt

I received this fabric for free in exchange for my review. I am a Hey June affiliate but paid for the pattern myself. All opinions are my own!

Tuesday, August 16, 2022

What You Need to Know about Sewing Brand Partnerships

Have you ever wondered what it's like to have a partnership with a sewing brand? Have you wondered if it's worth it to pattern test or be an affiliate? If it's the right choice for you? Well, grab a cup of coffee and settle in, because I'm here to dish on my experiences, and give you some things to think about if you're considering teaming up with a brand. 

What You Need to Know about Sewing Brand Partnerships

Please note: these are just my experiences, with many different brands and arrangements, and your experience will probably be different! I have been sewing and blogging for nearly a decade and have seen industry shifts in that time. You never know when things may change again! Also, I'm not going to name names. I will be honest but I'm not interested in throwing anyone specific under the bus. If that's what you're after, you can go ahead and click off ;)

First, let's define the different ways a single sewing hobbyist can be involved with companies. 

TYPES OF PARTNERSHIPS

Pattern Tester: Before a sewing pattern can be released to the public, it needs to be tested by people of various skills and across (ideally) all the pattern sizes. In my experience, established pattern design companies have a group of favorite testers that work with them. New pattern designers put out far more calls for testers. Of course, a tester pool can be ever changing, and the best way to know about open tester opportunities is to keep an eye on a brand's socials. For an interesting read on pattern testing, check out this post from Gillian at Crafting a Rainbow.

Brand Ambassador: A Brand Ambassador can take many forms, but generally they are a person who uses a pattern/product/fabric and then shares about it online. The skills required are less intensive as the brand is typically not asking for direct feedback or testing, just asking for marketing on one's social media platforms. 

Sponsored Post: A sponsored post (blog, Instagram or Facebook) is usually a one-off situation, with a specific product or item being used and marketed. Sponsored posts can be solicited by the brand, or, sometimes, pitched by the blogger to the brand. 

Affiliate: An affiliate marketer is someone who uses specialized links to refer customers to products. The affiliate then receives a small percentage of the sale as a referral fee. Affiliate programs are generally easy to be a part of or require a simple email sign up. Some places, like Share-a-Sale, are companies that run affiliate programs for other brands. You apply for SAS and then you have access to their brands.

COMPENSATION

Pattern testers are given a final draft of the pattern and sometimes compensated financially, or with a discount code for supplies. A Brand Ambassador is often given free or discounted patterns or fabric in exchange for their reviews. Like a Brand Ambassador, a sponsored post often involves a free or discounted product, and sometimes a monetary payment. Affiliate marketers receive a percentage commission. (Scroll down to see which of these, if any, are "worth it"!)

I'm going to take a minute here and also discuss exposure as a form of compensation. More than once, I have been enticed by a brand with a large following offering exposure of my work to their audience. More than once I have been disappointed, either with a lack of follow through (the brand doesn't actually share my work) or lack of response (my work is shared but I gain no new followers). 

One way to set proper expectations would be to review a brand's previous socials and see how often they promote their current partners. Do they use someone else's photos but don't link to that person's socials? Do they promote their own pattern but not the people who make them? How often are they sharing work from an ambassador and how many ambassadors do they have?

It would be great if I could stay objective here, but I'm becoming pretty salty about exposure as compensation. Exposure is not compensation. Consider it a nice bonus, but do not lean on exposure as a reason to do work for a company or brand. 

WORKLOAD

I have personally been involved in brand ambassadorships, fabric promotion, sponsored posts, and affiliate marketing. Each brand I've worked with has had different expectations but they have all been clear from the outset what those expectations are. Do not venture into an agreement with a company without having an exact idea of what is expected of you! 

Will they require a certain number of makes per month? Posts per month? Will there be strict deadlines? Can you meet those deadlines? Are you comfortable posing for photos or are flat lays acceptable? Can you easily take photos at home alone, or do you need an assistant or to travel to a good location? Will video content be required (Reels, Idea Pins, etc.)? Is your sewing equipment reliable or will it be in the shop for long periods of time?

These are just a few questions that you should have answers to before committing to partnerships with sewing brands. Always be prepared to adult and ask hard questions, or to formally end an arrangement if it's not working out. Please do not ghost! If you cannot fulfill an agreement, be upfront with the company, ideally long before a missed deadline.

FUN

I want to make sure to talk about fun, because I believe it is misused by people who are not in the creative community. Oftentimes, we are brought requests because people assume we sew for fun, and therefore we can do XYZ project for someone because it's just sO fUn FoR uS. I believe that brands are guilty of this assumption too, often pretending like working with them is so super duper funsies that maybe they don't have to pay you.

Don't fall for it! Do not be surprised if your partnership work often feels like, well, work! Any time you "have" to do something, it takes away an element of fun, even if you're being compensated.

On the flip side, I have had perfectly wonderful partnership arrangements that ARE fun. I derived personal satisfaction from working with the people or group. It made me happy. Place importance on your happiness, and pay attention to the projects that are sucking the life from you. 

BECOMING A PARTNER

So you've thought about all of the above, and now you want to know, how do you become a partner with a brand? I have a few tips.

Tell your friends. Make sure your friends know that you are looking for partnership opportunities. I have one sewing friend in particular who has tagged me in SO many posts that I never would have seen. We can't be all over the internet at once, so use your friends as your eyes and ears.

Follow new brands. Heard about a new sewing pattern company? If you like their work, give them a follow. Newbies are always looking for testers. They are also more likely to share your photos or become aware of you as a potential ambassador if you are making their patterns, simply because there will be less competition among their users. 

Apply for everything. I cannot tell you how many partnerships I've applied to and not gotten. I'm not big on  math, but statistically you will need to apply for way more things than you'd ever actually do if you want to land a gig. It's also good practice to put yourself out there on applications. You will inevitably gain more confidence and skill in pitching yourself. And please do not be afraid to sell yourself and your skills! Don't play the comparison game and think that your work isn't good enough. Companies usually want a wide range of skills.

IS IT WORTH IT?

I know what you're thinking: so how much money have you made? Well, I can tell you. Barely any!

I have been blogging since 2013. In that time, I believe I have been paid cash money for a blog post ONE time. And it was 2 figures. 

I have been an affiliate of many different companies (and Amazon) for years. I would be shocked if someone told me that I've made 3 figures in that time, with all of them put together. Most affiliate programs run at about 10% of the total purchase. If you buy a $15 pattern I recommend, I get $1.50. 

I have been given access to free patterns over the years. A generous estimate of the free patterns I have would be about 30-40. 

I have been given gift certificates for free fabric. This is definitely the most "lucrative" of all my arrangements. I'm probably approaching $500 worth of free fabric over the course of the last decade. Maybe more (though I also end up spending at times when I otherwise wouldn't, to bulk up orders or take advantage of the discount).

I run Google ads on my blog. Google Adsense has a minimum threshold before they pay out, which is $100. I've been paid by Adsense one time in nearly a decade.

So is it worth it? My answer in 2022 will be different than my answer would have been in 2015. Here's why.

I am self-taught. I learned all I know with extensive reading and, most importantly, failure. Many of my partnerships were a help to me as I grew and expanded my skills. Now, however, I'm a decade into this venture, and my skills are naturally the highest they've ever been. Of course I still have lots to learn, but the average home sewing pattern isn't teaching me much anymore (sounds braggy, but it's true!). 

A beginner testing a pattern will have a totally different viewpoint than an advanced sewist. A beginner is absorbing knowledge, whereas a non-beginner is typically dispensing it. Both are important aspects of a test! But the experience is different.

In my opinion, free patterns also become less appealing the more time one spends in this hobby. Eventually, you have the basic patterns for everything, and everything is hackable. Do I need another hoodie pattern just because it's free?

Affiliate marketing can work for some people, but it depends on how much effort you're willing to put in to creating content. If you cannot drive traffic to your links, nobody will be clicking on them. I think that the slight discount I receive for being an affiliate is usually more useful than any income from it. It's not unusual for me to get 100 clicks on an affiliate link before I get one single sale (and remember, that sale might only net me $1.50). Sometimes the conversion rate is even worse than that. How much time are you willing to spend on content creation for $1.50?

To be completely honest, any arrangement involving free fabric is my favorite. I take those kinds of commitments seriously and try to provide an equal value in return. I don't just post a few photos on Instagram, when I get free fabric I also strive to write a blog post, pin on Pinterest, post in Facebook groups, make a Reel, etc. It's important that you work with brands you do actually like so that you're not struggling to recommend them.

So there you have it, a decade's worth of partnership experience word vomitted into a blog post. Questions? Comments? I believe in transparency and am happy to help!

Tuesday, August 9, 2022

Saguaro Set Number Two--with coupon code to iSee Fabric!

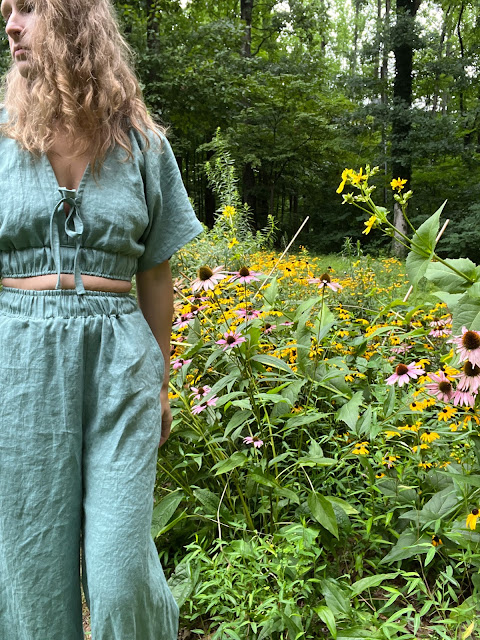
Okay yeah, I made another Saguaro Set. Consider this blog post just a bunch of beautiful photos of my garden and an amazing colored linen. Scroll to the end for a coupon code to iSee Fabric! If you want more construction-type details, visit my first post. Sizing and construction is completely the same, except I made the full length pants!

Saguaro Set Friday Pattern Co

Saguaro Set Friday Pattern Co

Saguaro Set Friday Pattern Co

Saguaro Set Friday Pattern Co


This Medium Weight Laundered Linen is from iSee Fabric and the color is Pond. It is so freaking beautiful, I can't get over it. I just keep petting it. I've used iSee Fabric for a ton of projects and I am never disappointed! If you want to try it yourself, save 10% with code 110CREATIONS!

Visit our Etsy shop!


Friday, August 5, 2022

Vintage Singer Buttonholer

This post contains affiliate links.

Vintage sewing machines are so cool. Every time I use mine, I feel connected to the long line of sewists who have come before me. I have a Singer 15-91 that was made in 1951. Vintage Singers are so reliable and just plain beautiful!

Vintage Singer 15-91

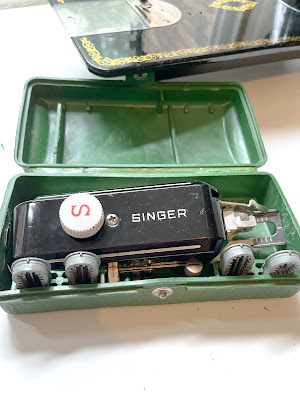
They tools they need to work, however, can be confusing. Ever look at a piece of vintage sewing paraphernalia and think "huuuuh?" That's how I felt the first time I examined my Singer buttonholer. It came with my Singer 15-91, along with a bunch of mysterious feet, and I was completely perplexed by it.

Vintage Singer 15-91 buttonholer

Luckily, I found a great book that describes vintage sewing machine feet, and I previously reviewed it here on my blog. I shared tons of great photos of my vintage bits and bobs, so check that out if you want more vintage Singer content. 

I'm somewhat amazed at this little piece of sewing history. My Singer only sews a straight stitch, yet I can attach the buttonholer and in no time have a perfect buttonhole. My modern machine cannot compare. I remember when I made a coat for my husband, the fabric was so thick that I had to sew buttonholes by hand. No more!

Vintage Singer 15-91 buttonholer

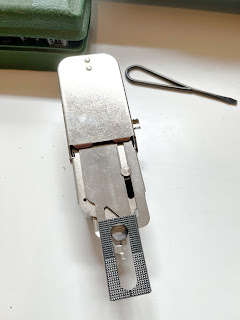
The first step is to cover the feed dogs. There is a metal plate with the kit and you use that to cover them. No "dropping" the feed dogs here.

Vintage Singer 15-91 buttonholer

Vintage Singer 15-91 buttonholer

Vintage Singer 15-91 buttonholer

The buttonholer uses different templates (called "cams") to create the shape and size of the buttonhole. The templates are marked with their length. You place the template inside the buttonholer. Then you attach the mechanism to your machine, much like the way a walking foot attaches to your modern machine.

Vintage Singer 15-91 buttonholer

The "presser foot" part of the buttonholer moves the fabric back and forth when you press down on the foot pedal, which is how a straight stitch machine can achieve a "zig-zag". It's pretty impressive and might actually be magic (video here).

Vintage Singer 15-91 buttonholer

To fill in the buttonhole nicely you'll want to go around the hole at least twice. In the above photo, the pink is SIX layers of twill, going around it twice. The brown is four layers of twill, going around once. Perfection!

To open buttonholes, first I apply Fray Check and let it dry. Then I use a buttonhole cutting kit (I bought the one with the little wooden apple, and immediately broke the apple, so I've linked to a different one here) and a hammer to open the buttonholes. Once you've tried the hammer+cutter combo you'll never go back to the seam ripper method!

Do you have a vintage sewing machine? Have you tried a buttonholer attachment? Don't be afraid of all these extra pieces, they can be so helpful!


Interested in learning how to make great Instagram Reels?
Check out my new e-book, written with the creative maker in mind!


Newsletter sign up

.