Wednesday, September 28, 2022

Flared Ash Jeans

Fall has arrived in the Midwest (wahhhhh, give me endless summer) and it's time to pull out my jeans. I've been making Gingers and Morgans for years, but I've never been 100% happy with them. It was time to try a new pattern, the Megan Nielsen Ash Jeans, and BOY am I glad I did!

Ash Jeans review Megan Nielsen

Ash comes with four leg views: Slim, Skinny, Flared, and Wide. The rise is undefined by MN, I would call it mid to slightly high (hits under my belly button). There are also two pocket depth options, something I've never seen before. It is intended for denim with 15-20% stretch.

Ash Jeans review Megan Nielsen

I used Cone Mills S-Gene Stretch Denim in Dark Indigo, 8oz weight. I have tried a variety of weights, and this 8oz is my favorite. I usually buy mine from LA Finch Fabrics because they have the best prices, and often sell "remnant" pieces in 1.5 yard cuts

Per usual, I had three machines going at once while making this pair of jeans. I used my regular Brother for construction, back pocket embroidery, and the buttonhole. I used my serger for finishing seams, and my vintage Singer 15-91 for all topstitching. It is SO nice to have a second machine for topstitching so you don't have to switch thread back and forth. I'm spoiled.

Ash Jeans review Megan Nielsen

I made a size 6 for my 27" waist and 37" hip. I recommend taking your measurements every time you sew pants, don't make assumptions about your size. I've been a 38" hip for a long time, but the 8 would've been too big. I would also say 27" isn't an accurate description of my waist, it's more like the size of my waist when I'm wearing pants that fit the way I like. With stretch jeans, you can get away with sewing for the waist you want, not the waist you have! It's also more functional that way, because my pants don't slide down from being too loose in the waist.

Ash Jeans review Megan Nielsen

There are two choices in inseam, regular or tall. Then each of those have a full or cropped option. I am 5'4" and made the regular, full length inseam, and found it a touch short for the flared option. For the slim or skinny I think the inseam would work, but for the flare or wide my personal preference is for jeans to touch the floor. I ended up letting out the hem and adding a wide hem facing so that I could sneak back every bit of length possible.

Ash Jeans review Megan Nielsen

I am blown away by how well these fit right out of the envelope. I'm trying really hard to review Ash without comparing it to Ginger (I'll save that for another post) but for jeans, I'm used to making a lot of adjustments. The only thing I changed was to remove a tiny wedge from CB in the yokes and waistband. I have a bit of a swayback and unless I make that change, I always end up with gaping. That's it! I still cannot believe it.

Ash Jeans review Megan Nielsen

The instructions for assembly are better than any I've ever used. Right/left, wrong side/right side, when to use topstitching thread and when to use regular thread, all those details were there without error. If you've never made jeans before, Ash could easily be a beginner jeans pattern. There is also a sewalong, but I didn't need it at all.

The fiddly bits of the pattern, like the fly or back pockets, were not graded into individual sizes. That might sound like a criticism, but it's not. It made cutting the pattern out so much faster not to have to worry about sizing something silly like a coin pocket. I had my pattern printed in large format at PDF Plotting.

Ash Jeans review Megan Nielsen

I made the jeans as directed, except for two changes. I used a stretch interfacing in the waistband and waistband facing (there wasn't any interfacing at all in this pattern). I also added bias tape to the waistband facing edge. I *hate* turning under the waistband facing and trying to topstitch or stitch in the ditch or whatever. Plus, pretty guts!

Ash Jeans review Megan Nielsen

I cannot say enough good things about this pattern! If I ever find 8oz S-Gene denim in black I will buy 100 yards and make each view. If you've been on the fence about jean sewing this fall, grab Ash and get to work! 

Thursday, September 22, 2022

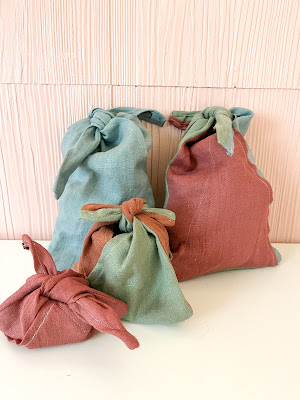
Reusable Bags with Linen Scraps

Today I am guest posting over on the ISee Fabric Blog! Head over there to check out my reusable gift bags using linen scraps. I ADORE the midweight laundered linen from ISee, and this project was perfect for using up all my precious scraps.

Reusable Linen Gift Bags

These bags would be a perfect item to add to your Handmade Holiday Gift Planner! No more last-minute scrambling to finish handmade gifts when you use this planner. Head here to grab it on Etsy, or save $1 by purchasing on PayHip.

Tuesday, September 20, 2022

Raising the Neckline on the Elysian Bodysuit

This post contains affiliate links.

I'm sure that five bodysuits is probably too many, but what if I change it up slightly? That makes it okay, right? My first Elysian Bodysuit was made without modifications. The neckline is super deep because it is intended to be the "entrance" into the bodysuit. It must be big enough to stretch over your hips and be pulled up onto your shoulders. I decided to raise the neckline on my next one, here's how I did it!


What's nice about this pattern change is that the front of the bodysuit is provided as a full pattern piece, not one cut on the fold. That makes it easier to get an idea of how to change it. For this hack, you will benefit from a French curve (I have and recommend this one), but it's not 100% necessary as long as you can sketch a nice neckline.


I made an Instagram Reel explaining my process, you can watch it here

If you raise the neckline, you HAVE to add crotch snaps, otherwise you will not be able to get into the bodysuit! Friday Pattern Co. has a tutorial for adding snaps here on their blog. Make sure to read it BEFORE cutting your fabric, because you need to add length to the crotch!


I made one other modification to this version, and that was to serge elastic to the leg holes, turn it down, and topstitch. The original pattern calls for a narrow band to finish the legs, but I prefer my method. I just got an elastic foot for my serger, so this was my first chance to try it out. Still working through the kinks but it worked well! I also did not hem the sleeves, for the same reason, that I just don't like narrow bands on swim knits.


You can find this fantastic retro floral swim print (with two solid coordinates!) at The Fabric Fairy. I am on the promo team but genuinely LOVE all their fabrics! Thank you Fabric Fairy for your support!

Tuesday, September 6, 2022

How to Get Started with Alterations for Money

This post contains affiliate links. Thank you for supporting me!

How to Get Started with Alterations for Money

If you know how to sew, chances are that someone has asked you to do alterations for them (sidebar, if you're an avid baker, do people ask you to make bread for them?). If you aren't comfortable doing alterations, I strongly encourage you to shoo those people away. Your time, energy, and skills belong to you and nobody has a right to them. But, if you think you're ready to take the first steps into making alterations for money, I'm here to share my do's and don'ts and what I've learned!


Overcoming fear

I got into alterations the way most people probably do...reluctantly. It started last year when a good friend asked me if I could help out the high school marching band with a costume they needed made. It was around the time when all my kids started elementary school for the first time, and I suddenly had hours during the day to take on work. Long story short, the band ended up leaning on my ideas more than my sewing skills, but I made a little bit of money and got experience meeting with clients I didn't know.

That first meeting...I was SO scared! What if they asked me something I didn't know? What if I was totally out of my depth? What if they wanted something impossible, could I finesse my way out of it? What if they took one look at me and decided I wasn't professional enough? Yes, I have anxiety, but I imagine any sewist would think some of these things.


I did three things to help myself overcome these fears. First, I bought a binder. Yes, it sounds silly. I bought a brand new, professional-ish looking binder, pens, and a fresh tape measure. I already had business cards (super generic, just my logo, website and email address) so I stuck a couple in the binder. I am 100% a believer in fake it until you make it, and giving myself the things that made me look successful was a part of that.

Second, I charged way too little for my time. Only you can choose the price that makes you comfortable, but for me I went with $15/hour. I have since started calling this the "friends and family rate" but the truth is, that was my introductory, low-stress, low-pressure, take-a-chance-on-me price. It was enough money that I felt I wasn't wasting all my time, but not so much that it stressed me out. I did not charge for my mileage, for my consultation time, etc. though I'm sure professionals do. Looking back, I'm super happy I started with a low rate and took that pressure off myself.

The third thing I did to prepare was to give myself permission to refer out a job. In addition to the custom costume, the marching band needed some alterations done to their drum major uniforms. They wanted a factory pleated, plaid kilt without a hem allowance lengthened. Once I looked over the kilt, I knew there was no way I could give them what they wanted. I was doubtful anybody could. But rather than take on the job because I was embarrassed to say no, I admitted that it was beyond my skill set, and gave them the names of two local shops they could call instead. 


The Right Clients

After the band costume, it didn't take long for someone else to hear that I was sewing for money and ask me if I made alterations. Again, the person who asked me was a very kind friend, the sort of person where you don't want to say no. The alterations were for her teenage daughter, and we started with something like 5 pieces. 


This time, I went the extra mile and created some invoice sheets (you can buy them in my Etsy shop, they are editable and you can add your own logo). This paperwork was the next step in my "try to look professional" plan. Again, I showed up with my binder and took notes and measurements and gave an estimate of my time for completion. It happened to be December and I was honest that handmade gifts for my family would be taking priority over alterations. Because I was working with sweet, super nice people, they made no demands on me. 

Over the next 8 months, I ended up doing alterations for these clients two or three more times. I charged my low, $15/hour rate. I made trips to their home for fittings and didn't charge extra. I think one single time I charged for a spool of thread. While I didn't make a huge profit in dollars, that work was invaluable to me for other reasons. I got the opportunity to work on everything from pants to hoodies to a prom dress. I practiced pinning on a real person and taking good enough notes to work from later. I was forced to estimate my time for a hem, for changing a sleeve, for moving a zipper. Basically, it was a paid internship.

The Next Step

After months of alterations for one teenager, she graduated high school and moved away to college. It felt like the natural time to both raise my rates, and also to make it more publicly known that I was doing alterations. I posted on my personal Facebook page and landed another job right away. This time, I charged $20/hour, and she came to my home for her fitting and item pick up.

After almost a year of on again off again alterations, I was astounded to find that I was *gasp* enjoying it! I cannot describe the way it felt to alter a garment, message someone that it was ready, and have them immediately pay me electronically. Sewing, this thing that started as a hobby and grew into a passion, is valuable. It's a skill. It's worth paying for and I CAN DO IT!

Other Opportunities

At this time, I have also gotten a few contract sewing jobs via Upwork. These are not alterations, they are more like sample sewing. There are often regional sewing jobs posted there, but I've seen quite a few that are remote. To protect clients and freelancers Upwork handles all the payment details (for a fee) but so far it's been a good experience. I can choose my own pay rate each time I bid for a job. It's easy to apply for jobs within the app, to log my time there, and to get paid.

I've also poked around on Indeed and there are sewing jobs there, but usually local ones with a more traditional application process. It never hurts to send an email and ask for remote sewing work even if the job is advertised as local.

Heading into the holiday season, I've also toyed with the idea of making some small items for a pop-up shop. Zippered bags, reusable gift wrap, etc. We'll see if I end up having the time, but as a side gig, once a year only thing I don't hate the idea. 

Further Reading


Angela Wolf wrote a great book in 2012 called How to Start a Home-Based Fashion Design Business. I've pulled it out again recently with fresh eyes, it's a great resource if you're curious about different ways to turn sewing into a business. 

If you need any reminders about how to stay firm in your skills, your value, and the crazy kinds of things people will ask you to do, check out the Instagram account Can You Sew This For Me

Do you make alterations for money? What has your experience been like? Let me know in the comments!


Newsletter sign up

.