Thursday, August 10, 2023

Sew DIY Eva Crop and Sundress

July landed me solidly in two different pattern tests at the same time. The first was the Madison Blouse (not blogged yet, I want to make it again from the final pattern), and the second was the Eva from Sew DIY Patterns. All versions of Eva have a super cool lace up back that I love!

Eva Dress from Sew DIY

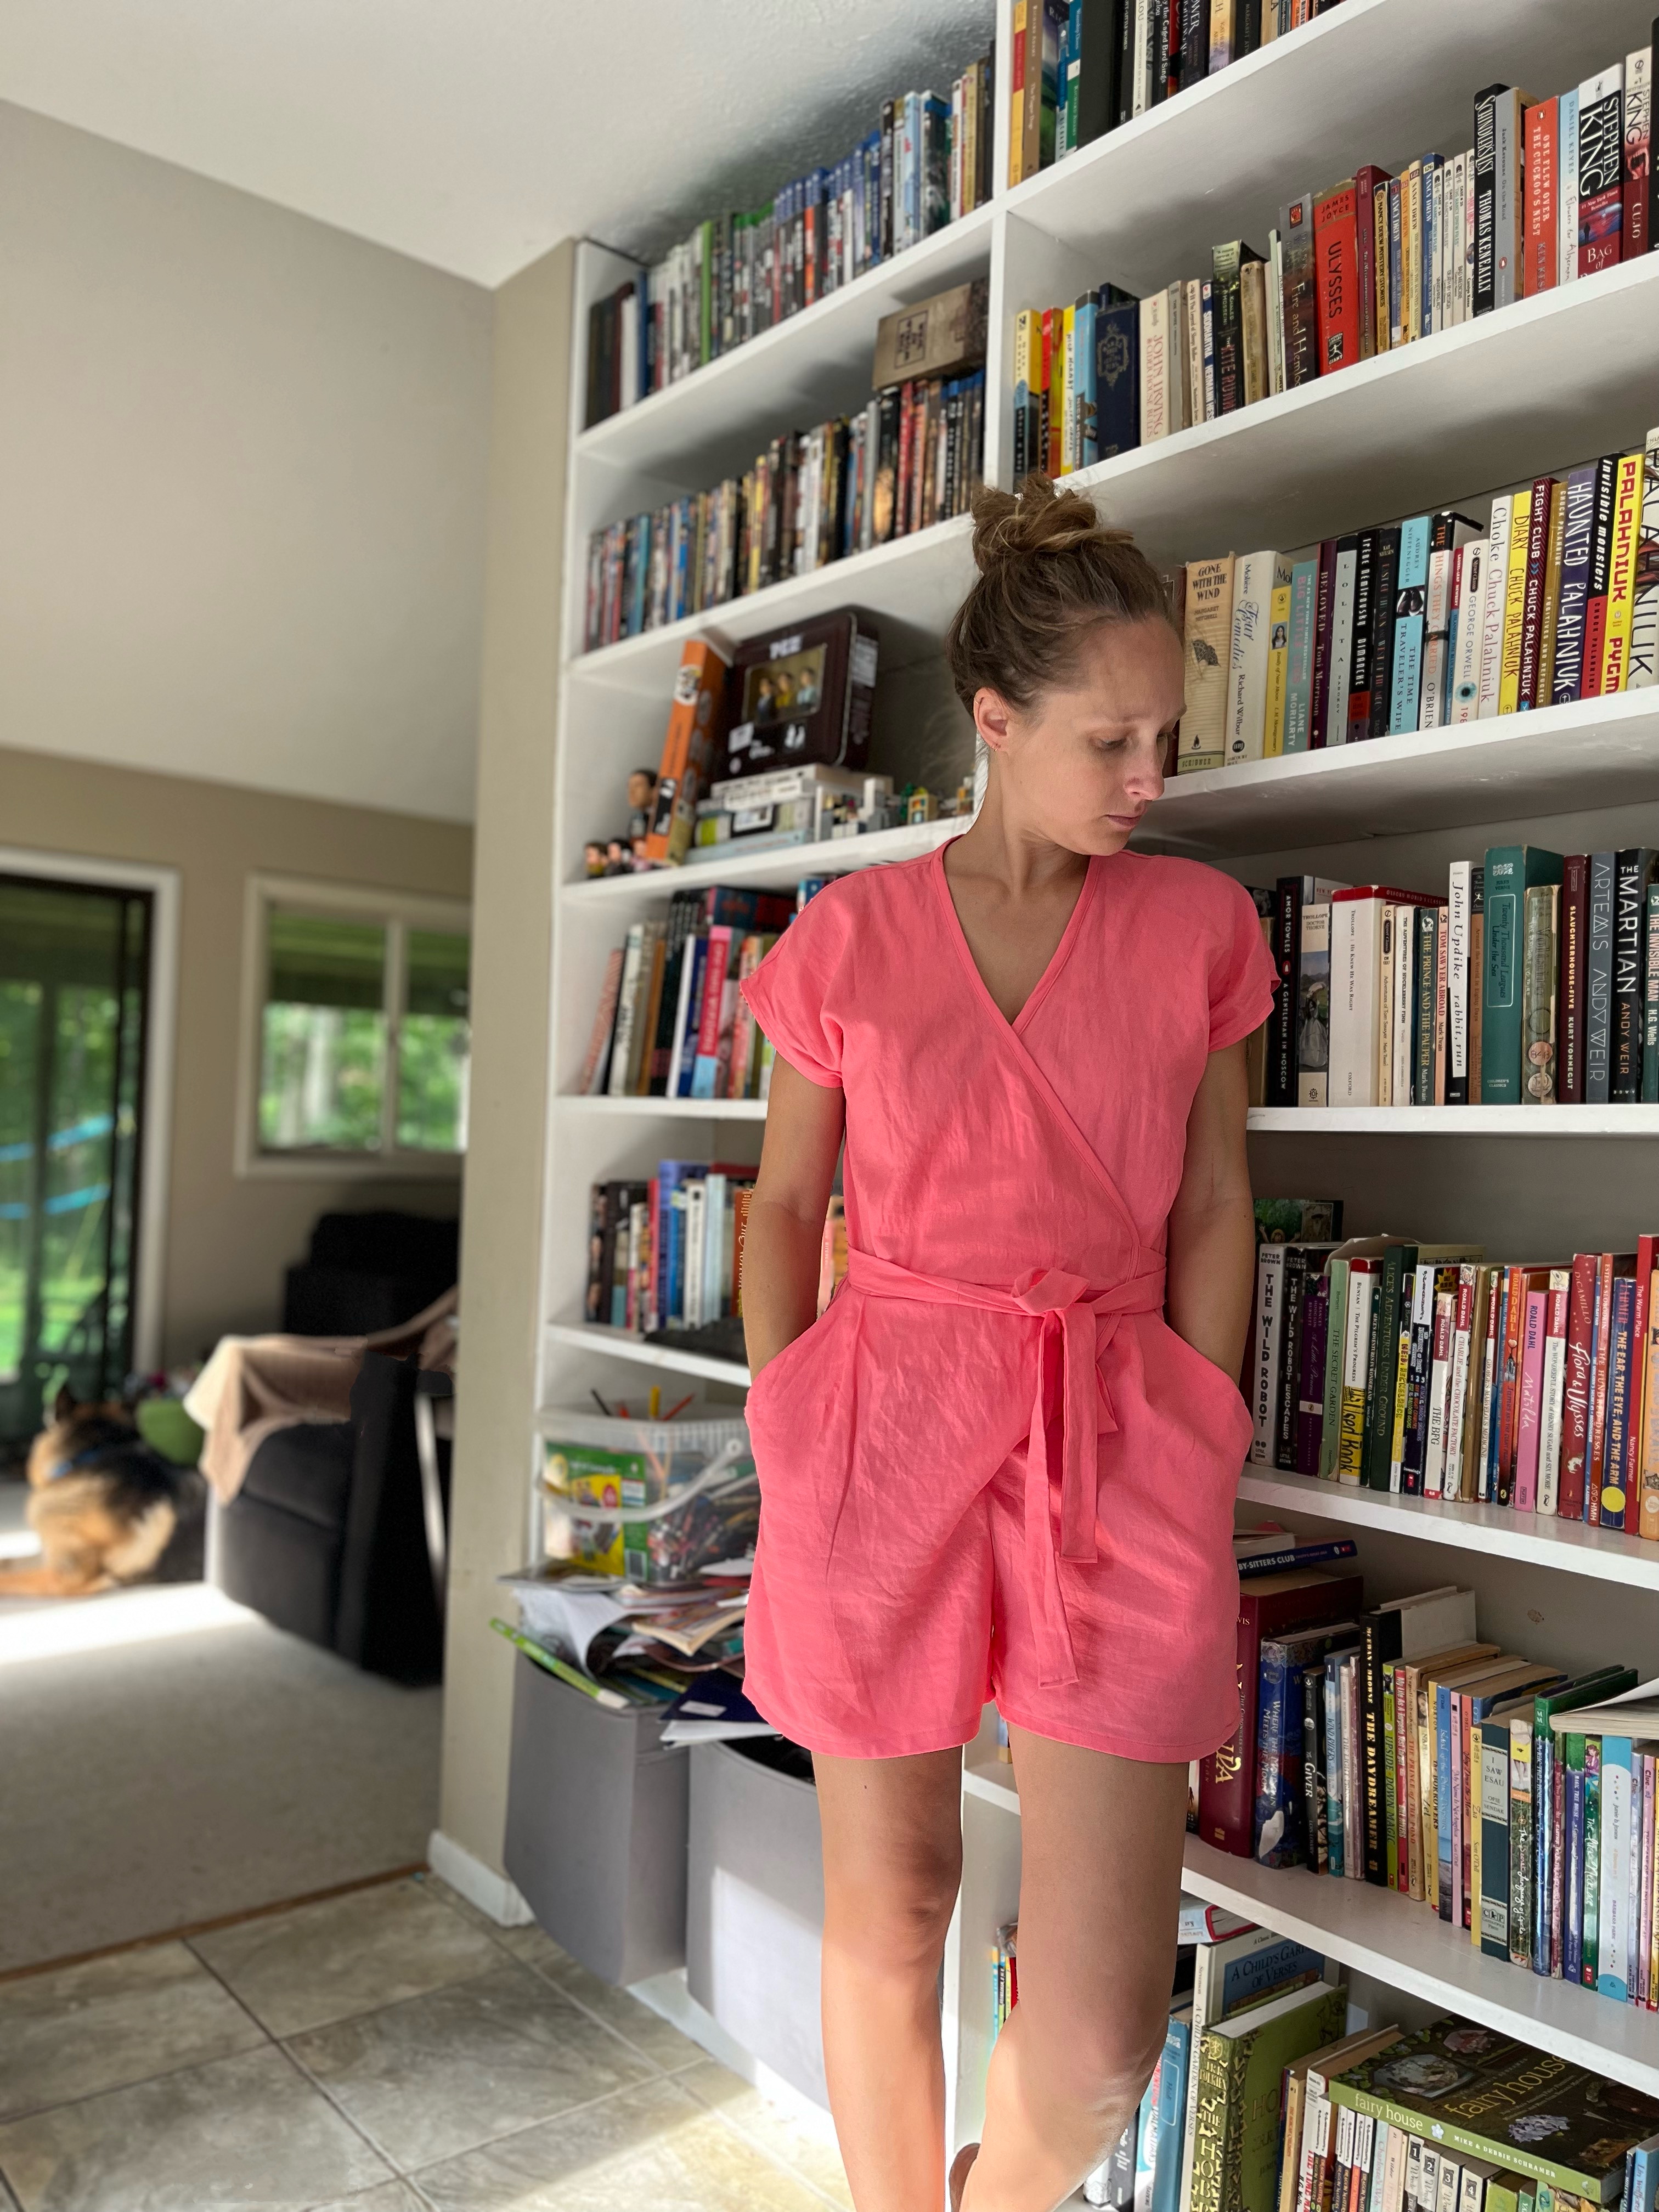
Eva can be a crop top, a top with a peplum, or a dress with a skirt and ruffle. Bust sizing is from 30.5"-60.5", with 3 cup options. My bust is 33" and I made a size 6 in an A/B cup. I used a double border rayon challis from LA Finch Fabrics.

Eva Dress from Sew DIY

Eva is interesting because there are only two pattern pieces, and everything else is a rectangle. There is a big ole chart that gives the dimensions of the back pieces, the skirt, the peplum, etc. There is also a page to print to fill in the dimensions for your size. These pages are clearly marked in the pattern with a big circle that says "print this page!". I loved it, I thought the pattern was well-organized.

Eva Dress from Sew DIY

I highly recommend making a muslin of the bodice. The pattern directions walk you through the process way more explicitly than I've seen other patterns do. Eva does have flexibility in the fit because of the back. The back has two side panels with an adjustable middle panel. The middle panel has elastic in the top, and a lace-up tie. 

Eva Dress from Sew DIY

The pattern directions are super clear about when to stop and have a fit check. You'll have plenty of opportunities to check the strap length, and to adjust the back panel elastic. The back panel can be tricky since it's, well, on your back, so if you have someone else to help that's a plus. I did it alone though!

Eva Dress from Sew DIY

All the work for this pattern is in the bodice. It's completely finished (except the hem) and then you can decide whether you want it to be a crop top, to have a peplum, a skirt, a skirt+ruffle...really you've got lots of options. Again, these pieces are just rectangles. IMPORTANT to note however; the pattern is drafted for a height of 5'10". This is certainly taller than average, and it's 6" taller than me. I had a chat with the designer (her name is also Beth) during testing about how to adjust the pattern for much shorter heights. I haven't seen a final draft of the pattern so I'm not sure if any of my feedback made it into the directions.

Eva Dress from Sew DIY

I wanted to use the border for my ruffle, so I ended up removing 5" from the suggested cut height to accommodate. The skirt portion I shortened by 1". I did not change the bodice length because I have a long torso. The waist seam hits at my natural waist, perhaps just a touch below due to the weight of the skirt pulling it down. If you have an average or short torso you'll need to adjust.

Eva Dress from Sew DIY

This is the perfect sort of dress to throw on and eat tacos. Pull your ties tight in the back on your way out, then eat a ton of food and let them out again. I am wearing mine here with a strapless bra. I found that the straps had a tendency to move around (due to tightening and loosening the tie) and my bra straps were always showing somewhere.

Thanks to Beth at Sew DIY for choosing me for her test, and for compensating her testers. I was not asked to promote the pattern in any way and all opinions are my own!

Tuesday, August 8, 2023

Why I Chose a Juki MO-2800

Have you ever gone to an animal shelter to adopt a kitten or a baleful-eyed dog and been like, "oh my gosh, this is such a big decision, I can't decide, and they are all so adorable!" That's basically what it's like to pick out a second tier sewing machine. 

It's so easy to find a beginner machine. Just go to Amazon and type in "beginner sewing machine" and boom, there's the Brother CS-6000i. Type in "beginner serger" and boom, Brother 1034-d. A gajillion reviews and YouTube videos and all the info you could possibly need. But picking a SECOND tier machine? That's like picking a kitten.

Last year, my Brother 1034-d got a little finicky on a paid sewing job, and I had to take it in to the shop. It was the first time it had ever been serviced. It's never quite been the same after that. Last week, I once again broke the timing on it on the last six inches of another paid sewing job. It's a $300-$400 machine, and it just did not make sense to sink $100 into it for service again. I tried fixing it on my own (I've got an Instagram highlight saved if you need info on the proper way to fix the timing) but honestly, it felt like a waste of time.

After it broke the first time, I knew its days were numbered and I needed to start looking at an upgrade. But I was completely overwhelmed with options. I've always had Brother machines, but I didn't necessarily want another Brother. People love to talk about their fancy Babylock sergers, but fancy doesn't always mean best. I also did not need a combo machine because I have a dedicated coverstitch.

My first step was to search serger reviews on Pattern Review. I saw a lot of highly rated Juki machines. I went down the Juki rabbit hole and found three not-beginner sergers that were "reasonably priced" (in quotes because this is entirely subjective) between $1000-$2000 USD. Considering I made a $300 serger last 10 years, that price range seemed pretty acceptable.

I called the nearest Juki dealer, who is about an hour away. It also happens to be my favorite "local" shop, which carries high end apparel fabrics, indie patterns, sashiko supplies, all kinds of good stuff. They had the three machines I was considering available as floor models for me to try.

I went to The French Seam and spent some time with the owner reviewing these three machines:

Juki MO-1000

Juki MO-1000, retail $1300

Juki MO-2000

Juki MO-2000, retail $1500

Juki MO-2800

Juki MO-2800, retail $1600

First impressions of all three machines: way better than my Brother. Each one had fantastic stitch quality. All three had air threading. The variety of stitch options was pretty much the same. 

The 1000 and the 2000 were almost identical in function, except that the 2000 has an LCD display to give you all the stitch settings without you needing to pull out the manual. 

The 2800 was the mack daddy of them all. Bigger machine. More space on the bed vertically and horizontally. Optional table add-on (didn't get it...yet). And one very, very important feature: a knee lift.

If I had never used a knee lift before, I probably would've been fine with the 1000. But I've been spoiled with the knee lift on my regular machine (Brother PC-420). I've tried to use other machines without a knee lift and I can't do it anymore. The knee lift is like a third hand when you're sewing. Would you pay an extra $300 for a third hand?

Turns out, I would. The MO-2800 should last me many years, and thinking about $300 spread out over a decade...yeah. Of course get the knee lift.

It is also quiet(er), and easy to thread, and it doesn't shake my sewing table. It's sturdy and sews beautifully. Of course, I'll update after more time, but for now I am thrilled with this machine!


Thursday, August 3, 2023

Zadie Jumpsuit by Paper Theory

There are a few sewing patterns that have achieved Platinum status. Ginger Jeans. Vogue 9253. Hinterland Dress. Ogden Cami. And the Zadie Jumpsuit!

Zadie Jumpsuit

If you haven't already made this pattern, you've got it on your list. It's one of those patterns that every time I see one, I think, that looks great on that person and I need to make one! But it wasn't until the Social Sewists at Workroom Social had a sewalong that I finally did it!

Disclaimer: I've been freelancing for Jennifer at Workroom Social for a few months. I have free access to the Social Sewists network and Jennifer purchased the Zadie pattern for me. That said, I was not asked to write or talk about the process and this is not a paid post.

During the Zadie sewalong, I attended as many of the live Zoom sessions as I could. I also appreciated that they were recorded, and I could watch them back later. Social Sewists is hosted on an app/website called Mighty Networks, which is easy and fun to use (no Facebook required). All the Zadie classes are neatly organized in one place.

Social Sewists on Mighty Networks


The session on choosing a size for Zadie was SO SO SO helpful! Jennifer walked through different student measurements, compared them to the size chart, and discussed how the amount of ease might look depending on which size that person chose. 

Zoom session on choosing a size

I'm pretty sure everyone has heard that sizing on Zadie can be hard to nail down, which is what has always intimidated me about the pattern. But after the sizing session with Jennifer, I felt totally ready to start.

My measurements are 33-28-38. According to the chart, that would put me at an 8-10/12-10/12. There is 5 1/2" of ease in the bust, 7" of ease in the waist, and 8" of ease in the hips. That's...a lot. Many people in the class expressed concern about the dreaded saggy-butt look.

A Sewist's Notebook

I decided to muslin a size 6 (the smallest size) in the bodice and an 8 in the hips. Note that this is one full size down for each area (waist and hips I'm between 10 and 12). I have a long torso despite only being 5'4", so when I make a jumpsuit I do like to check where the waist is going to hit me. The pattern is drafted for 5'7" but spoiler alert: the bodice length was fine with no adjustments. If you have a short torso, definitely check that.

I highly recommend a muslin of the top with one pant leg. That's a weird thing to say, and mine was totally by accident (lack of fabric) but the one leg ended up being super helpful! Here's my single crappy photo that I took:

Zadie Jumpsuit

You can see here that the crotch curve is crazy deep. You do need the crotch to be low enough that you can sit down, but this looked bonkers low. 

There are lengthen/shorten lines on the pattern piece right through the hip line. Typically, you see those lines across the legs, so it was kind of weird that it was in the hip. As if the designer KNOWS that the crotch is too deep.

On my muslin, I pinched out 1 1/2" across the hips/crotch and made sure I could still move and sit down. I could, so I made the change to my paper pattern and got to work on my final version.

Zadie Jumpsuit

The fabric I used is a Barbie-pink washed linen from LA Finch Fabrics. While I love the color, and the fabric is very soft, it is sort of sheer. I ended up pairing a light pink bodysuit with the jumpsuit and it eliminates any issues with the fabric being see-through.

Once the fit issues are handled, the pattern comes together crazy fast. For a jumpsuit anyway. The directions are good and I had no issues with assembly.

Zadie Jumpsuit

Last weird thing about this pattern: the cross-over in front. I never understood how it worked until I had the pattern in hand. It's hard to explain in words, so check out this Reel I made showing how it ties and unties. It weirds me out a bit to have the center front cut all the way down to the crotch, but once again, the bodysuit underneath keeps everything locked up nicely.

Zadie Jumpsuit

I only had two yards of fabric, so I couldn't make the full leg version. I would sew this again to make the long pants. Maybe in a dressy fabric for a fancy jumpsuit.

If you're interested in learning more about the Social Sewists, you can read about it here. I could not believe how much I learned from one simple video about choosing a size! This is not an affiliate link, and I do not receive anything for sending you over there. 

Are you on the Zadie bandwagon, or still running to catch up? Let me know in the comments!

Newsletter sign up

.