Tuesday, January 25, 2022

The Best Fabric for Sewing a T-Shirt

best fabric for sewing a tshirt

If you have to pick one sewing project that is worth perfecting, I think you would have to pick the t-shirt. And like all projects, the t-shirt lives and dies with fabric choice. So, which fabric is best for your basic, boring, staple shirt? Lucky for you, I've made the same pattern over and over and over in many different fabrics, making it quite easy to compare them and see how they perform over time. I'm demonstrating with the Hey June Union St. Tee, but you can sub in any loose fitting knit tee pattern (note: I am NOT talking about close-fitting patterns that require spandex!). Let's get started!
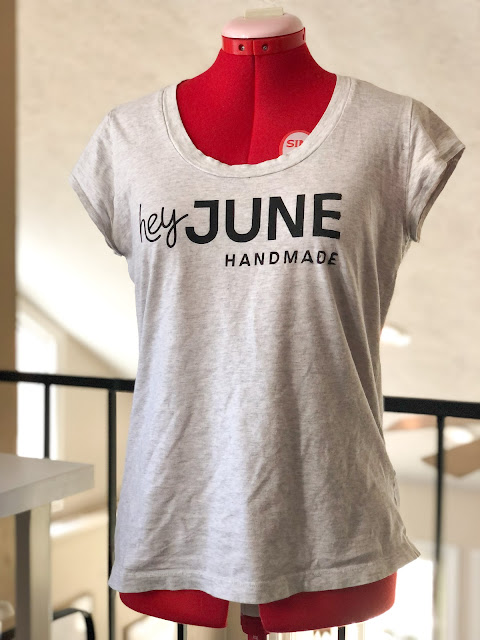
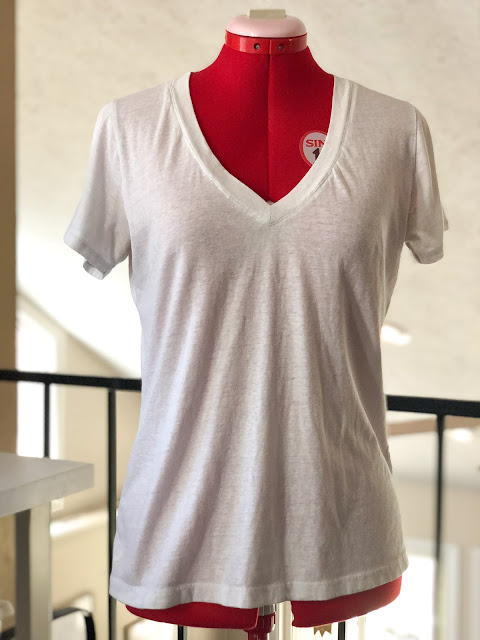

Cotton Jersey

The most basic of all knits: cotton jersey. And it's actually kind of hard to find! I'm not sure why, I love a good cotton jersey. Of all the fabrics I'm evaluating today, I will say that it has the least fluid drape. Without spandex, it can have a poor recovery, meaning you should tread carefully applying the neckband (put it in flat if at all possible so you can control the stretch). That said, you can't beat the breathability and easy-to-care-for cotton t-shirt! If wrinkles bother you, pull it out of the dryer right away and you'll be fine.
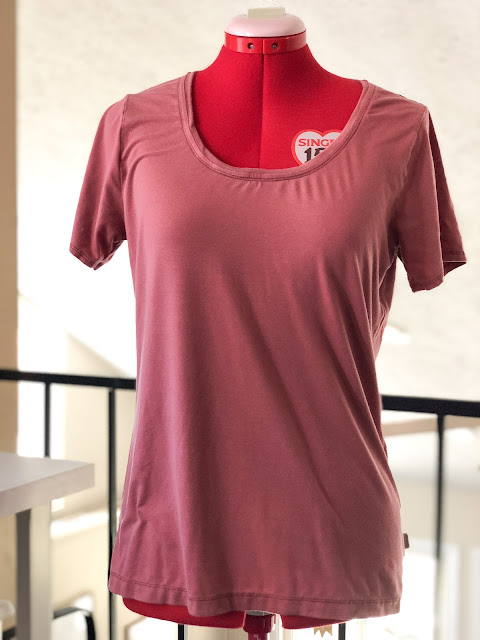

Merino Jersey

This one made it onto the list by accident! Ages ago, I ordered a rayon jersey from The Fabric Store Online and was accidentally sent one of their lightweight merino jerseys. The shirt I made with it has become, no exaggeration, my favorite shirt of all time. The drape is beautiful, better than cotton but not as clingy as rayon. The recovery (I don't know if it has spandex or not but I think not) is great. I machine wash on delicate and lay flat to dry. It never bags out, is naturally anti-bacterial, and always looks great. Worth mentioning, I have a few tees in merino/spandex jersey and I don't like them as much. They seem to shrink more with the same laundering process.
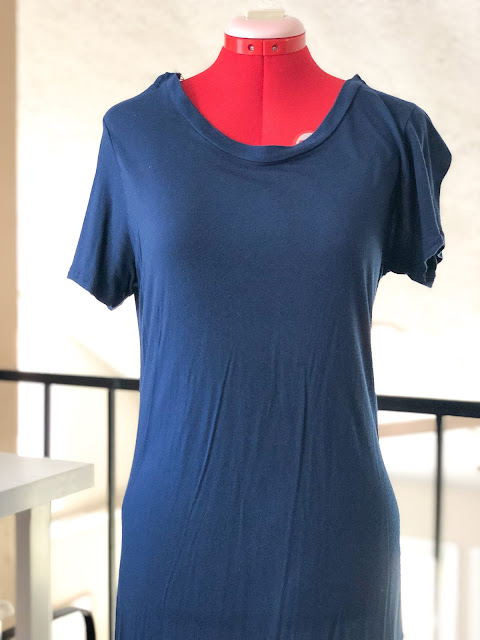

Rayon Jersey

Forgive me for putting a dress on here, but this is just a hacked longer version of the same t-shirt pattern. I wanted to show a rayon jersey that did not contain spandex. Lightweight, drapey, okay recovery but sags with wear. Fewer wrinkles than the cotton jersey, but still wrinkled. Lighter than a rayon knit with spandex. Not my favorite, but not my least favorite either.


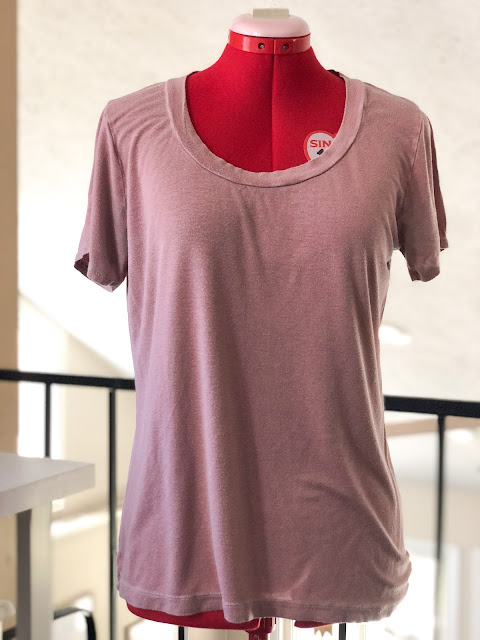
Rayon/spandex Jersey

The biggest strength of rayon/spandex jersey is its comfort. Soft, liquid drape, it's very wearable. Its big weakness is that it is heavy, and over time grows and grows and grows. It's not unusual for me to take a year old t-shirt made with rayon/spandex and cut it down almost a full size. I used this fabric a lot when I started making shirts, but over time I haven't been pleased with the longevity. If you look closely on the one above, you can also see how it has pilled, a common trait of rayon jersey.


Modal/Cotton/Spandex Jersey

Now that we've dipped our toes into the rayon knits, let's look at a blend. Modal is one of many names for a cellulose (plant) based fiber made from trees, bamboo, etc. (see Tencel and Lyocell below for the same sort of fiber). Fabric I've purchased with the brand name modal tends to be a higher quality than something generically named rayon. In particular, I love modal when it's combined with cotton and spandex. The addition of cotton makes the t-shirt less prone to pilling and sagging, and makes it lighter weight. This shirt is one of my faves and has not grown over time like the green one above. In taking these photos I noticed that it has mayyyybe just the start of some pilling, but I have worn and washed it a LOT for even that to happen.


Tri-blend Jersey

Now we've arrived at one of the only times I allow polyester into my wardrobe. Many shops sell something vaguely called "tri-blend" as shorthand for a fabric with three fibers. Typically these will be cotton, polyester, and spandex. These are kind of hard to find (I got mine from Sly Fox) but they are great! The polyester means they're a touch less breathable than a fabric containing only natural fibers, however that is made up for in their longevity. I've worn the crap out of my tri-blend tees and they just keep coming out of the wash looking the same. No sagging! If you sneak a peek at your favorite ready-to-wear tee, I'd bet money it is made from a tri-blend.


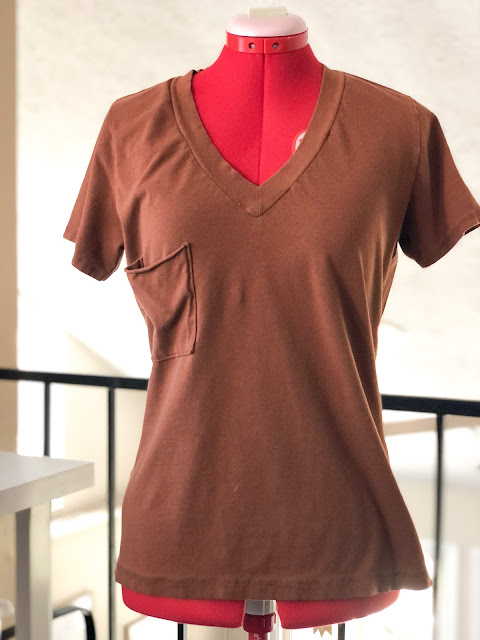
Tencell Lyocell/Spandex Jersey

I'm still on the fence about this particular shirt. It has the softness of rayon/spandex, but I haven't had it long enough to see if it sags over time. I miscalculated the neckband (it needed to be shorter) and so I'm not crazy about how that part looks. It does seem to wash well. I wanted to include it because it was overstock from a high-end designer, so it must have some value! 

I probably have even more blends and weights hanging around, but I think these are the ones you will find most often shopping online. The only ones I don't have to show are a polyester knit, and a linen knit. I avoid polyester as much as possible, but it would typically behave like a slinky rayon jersey. All the linen knits I've encountered tend to be sheer, expensive, and not always with great recovery. They would behave a lot like cotton jersey.

So which is my favorite? Hands down, no question, merino jersey! Second would be a tri-blend cotton/poly/spandex or a cotton/rayon/spandex. My favorite source for merino jersey is The Fabric Store Online, and as mentioned above you can sometimes find tri-blend at Sly Fox, or The Fabric Snob. Ready to sew your own t-shirts? Grab the Union St. Tee pattern here to get started on your own closet full of tees!

Is there a fabric I left off that you want to know about? Leave a comment below!

This post contains affiliate links. Thank you for your support!

Monday, December 20, 2021

Elf Slippers Hack with the Buddy Booties Pattern

Welcome to the 5 Out of 4 Pajama Party! All pajama patterns are 30% off through December 24th, AND there is a massive giveaway over in the 5oo4 Facebook group. Follow this link for all the details!

Hello everyone! Today I have an easy tutorial for how to turn the Buddy Booties Pattern (from 5 Out of 4 Patterns) from regular slippers, to elf slippers. I made these for my 9 year old and she loved them so much, she wore the outer shell around the house before I could even finish lining them! 

Why yes, that is a Cricut I bought myself in the background

These booties would be extra fun with bells on the tips, or even a red ribbon around the ankles instead of an elastic casing. Don't worry, the pattern directions give you options for a tie around the ankle. I definitely meant to get bells for the toes, but in all the holiday commotion it didn't happen. One of these days!

For this hack, you will need the Buddy Booties pattern, and some tracing paper. The only pattern piece we will be altering is the top of the foot. 


The top piece will need to be traced off and cut in half from toes to ankle over the top of the foot. We will be adding a seam here in order to change the shape over the toes.


Once you have your half pattern piece, lay it on top of another piece of tracing paper. You will need to add the seam allowance (3/8" for this pattern) AND sketch in a curve for the pointed toe.


My curve ended up being about 3" tall. Remember that some of the size will be removed when you sew it together, so error on the side of bigger for your point. 


Before you cut your fabric, mark an X on the top foot piece exactly where you had previously cut it in half. This spot will match up with the center front of the sole when the boot is sewn together. 

Cut your fabric, you will need two halves of the top foot for each bootie (four total). Do not worry about the lining, it can be constructed with the original pattern pieces.


Right sides together, sew each top foot portion together starting from the X, around the point, to the top of the foot. Assemble the rest of the boot outer according to the directions. When it comes time to sew on the sole, remember that the center front of the sole will match up with the X you marked before.


You will not be able to sew the sole on in one pass. As you approach the X, sew right to it, backstitch, and cut the thread. Then repeat on the other side. You may need to snip into the top foot piece and the sole to get everything to lay properly.


When you turn the bootie shell right side out, you should have the seams meeting perfectly at the X like this:


That's it! Construct the rest of the booties as directed, using the original pieces for the lining to reduce bulk inside the point. Embellish, gift, and post a photo in the 5oo4 Facebook group to win the giveaway!

I received the Buddy Booties pattern for free in exchange for a blog post. I am a 5 Out of 4 Patterns Brand Ambassador. Affiliate links have been used. Thank you for supporting this blog!

Friday, November 26, 2021

Washable Paper Projects with Organic Cotton Plus

Save 15% on Black Friday with code 15ONFRIDAY at Organic Cotton Plus

If you're a long-time reader, you may recall a few posts I did for Organic Cotton Plus, most recently this wool felt tote bag. I am a HUGE natural fibers nerd, and since that's all OCP carries, it was always a match made in heaven! Naturally, I was super excited when they reached out to me again for another collaboration. Today's post is all about a cool product that I'd never used before, washable paper!

Washable paper is also known as "vegan leather" and is made from pulp. It is sewable with a regular machine, and in fact I even used a small needle by accident without issue. Washing and crinkling the paper gives it a distressed finish that resembles leather. My first idea was to use a small piece as a tag for the back of some Ginger Jeans. Here is the paper sewn to the jeans without any washing at all:


And here is the same pair of jeans after washing and drying:


The paper crinkled up and became very obviously more distressed. I can't wait to see it evolve as the jeans get worn!


Next up, I wanted to try making a reusable sandwich bag. I cut apart a paper lunch sack and used it as a pattern for my own bag. 


This project ended up being a lot harder than I thought! In retrospect, I should have deviated from my design so I could sew it with my machine. I ended up hand-sewing with heavy weight shoe making thread. I haven't washed this bag yet, but I anticipate being able to crinkle it and roll it like a regular sandwich bag. I think it will make a great gift for an eco-conscious and thrifty friend of mine.


I also sewed a simple clutch with the washable paper.


This clutch is a large rectangle folded over. I sewed the side seams and then put the clutch into the washing machine and dryer. When it was about halfway through the drying cycle, I pulled it out and turned it so that the seams I had sewn would be on the inside. I was impressed that the paper withstood my mangling, even when wet. Once it was finished drying, I topstitched the bag and added a snap. I decided to go one step further and block printed on the back of the clutch. The paper took the block printing ink well (any mistakes are due to my own lack of experience with block carving and printing!). 


Last but not least, I went with a small scale block print and another tag. This one is a folded tag on a handmade scarf. I printed it with "110" which is part of my brand name. I think the tag looks like leather! I love that even a tiny piece of this washable paper can be used. 

Order the washable paper here from Organic Cotton Plus. It is 19" wide, I ordered one yard and had plenty for these projects with some left over. Thank you OCP for letting me try out this product, I will definitely be using up every bit that I have!

Organic Cotton Plus provided me with fabric for this review. All opinions are my own. 

Monday, November 15, 2021

Cashmere Rumana Coat

How many handmade coats does one person need? Don't answer that.

Last year, I scored some amazing cashmere/wool/nylon coating from Fabric Mart (side note, I buy almost all my wool coating from FM, they carry deadstock so you never know when or what you're going to find but if you see something you love, NAB IT). They had a ton of colors of this stuff and it was hard not to buy more than one cut. This fabric was overstock from Michael Kors and was $20/yard when I bought it. Pretty hard to beat that price, and it's easily the nicest coating I've ever used. The lining is a grey silk crepe de chine that I ordered from FM at the same time.

I knew almost immediately that I wanted to make a long coat, and landed on the Rumana from By Hand London. I ordered the pattern to be printed at PDF Plotting, made a muslin...and then did nothing. Well, not nothing, I opted to sew the Oslo Coat which had been sitting in my sewing room for a year before jumping on to the "new pretty" Rumana. Which meant the Rumana sat in my sewing room for a year. Notice a trend?

Anyway. After years of sewing coats, I recommend that you start one in September. Don't wait until it's actually cold. Don't wait until October because then you'll be overwhelmed with Halloween sewing. Or maybe that's all just me and seasonally specific to southern Indiana.

The day I finished the coat it was something like 80 degrees. As of this writing, it's November and I still haven't worn it. But that's okay! It just means that the mistakes (because obviously there are mistakes) won't be on the front of my mind when I eventually pull it out to wear.

The Rumana is a long coat with princess seams, a back vent, and welt-ish pockets. My measurements are 33-28-38 which put me at a size US4 in the bust and US8 in the hips. I also needed to shorten it 3 inches, I'm 5'4". I could not find what height it's drafted for, those 3" I removed based on how my muslin looked. All those seam lines make adjustments easy, but also leave a lot of room for error if you don't adjust across all the pieces (including the lining) correctly. To keep things simple, I cut a size US6 across the board, and then let the seams out over the hips. In retrospect, I probably should have just graded appropriately over the hips. It does fit very closely, which I think turned out fine since I don't anticipate this as an every day, over all the bulky hoodies, kind of coat.

As far as coats go, I found construction to be not too bad. I'm not sure why. I feel like I'm losing perspective on time because my kids are at school all day, and I can work for a few hours uninterrupted (a luxury, I know!!). I've also made five or six lined wool winter coats and countless jackets, so I do have a fair amount of experience. Does that sound braggy? I'm not trying to brag, just to give an appropriate assessment of the pattern and skills needed to sew it.

There is a sewalong online, which I always find helpful with coats. I do have one GIANT beef with the directions, which led to my huge mistake. The buttons are on the "wrong" side. If you follow the illustrations in the pdf, they are wrong. If you follow the written word, they will be correct. If you use your brain, you'll be fine. Now you can see how I ended up doing it wrong.

Nobody will know except me when I go to button the coat and have to do it backwards. But still. Sucks to spend so much time on something and not have it be correct.

The other thing I think I might have done wrong is the vent. It looks fine, but I can't help shaking the feeling that it's also backwards. This was my first time sewing a vent so I don't really know. My hand-sewing also looks a little tortured.

Long coats have a tendency to feel extra fancy to me, and obviously this color screams LOOK AT ME. But my friends who do not live in the Midwest tell me that long coats are fine everywhere else and not "too fancy" for every day wear. We'll see how often I reach for this one, versus my old friend the short olive Yuzu Coat.

Thursday, November 11, 2021

Kalle Shirtdress

Y'all I'm struggling to keep up with blog posts. I barely managed to keep a list of "projects not blogged" much less to actually blog them! But with the daylight deserting me I'm finding more time to write...taking pictures is another matter!

May I present my Kalle Shirtdress, made in January 2021. Now. If you know me as a sewist, you know me as a sewist who hates on Closet Case Core Files Patterns. I also give them props when they deserve it. I fit their size chart well, and some of the designs I like. I'm not going to go into negatives here, you can read them in my Ginger Jeans or Kelly Anorak posts.

Back to Kalle. I'll never forget when this pattern was teased, Heather Lou told a story about wearing her prototype and being CHASED down the street by someone wanting to know where she got it. I think about that story every single time I wear mine, and I'm still waiting for the day someone chases me for more details. I'll let you know if it ever happens.

This Kalle is a size 6 for my 33-34" bust. It is the tunic length (there are three lengths). I thought I would need to grade over the hips since it is that long, but upon reading the directions I found that grading is not advised! Take that however you want. I made a size 6 and sort of narrowed my seam allowance towards the bottom. The fit is fine, the box pleat in the back allows for room over the hips.  

Speaking of that pleat, I used an inverted box pleat. I think I thought it would look more interesting, but in fact it allowed the back to balloon out more than a regular box pleat. At least, I think it did, and it gives me that impression when I look over my shoulder into a mirror. Next time, I will use a regular box pleat.

For the collar stand facing I used a lightweight woven that I believe was gifted to me by Loni when I won a giveaway. The hem is finished with vintage bias tape that I bought on ebay (did you know that was a thing?!). I added a Kylie and the Machine label under the pocket, and a 110 Creations label on the yoke facing. There's a lot of detail in this shirt but you do get to skip setting in a sleeve and a tower placket, so, yay!

The fabric I used is a cotton/linen woven from Alyssa May Designs, and I adore it.

I have a hard time styling this shirt because it looks weird with anything other than leggings. You can't really wear it with shorts, but it has short sleeves. It's hard to tuck neatly under a cardigan because of the dolman sleeve. I don't reach for it as much as, say, a Willamette because it's a more crisp fabric. I do like it quite a bit and I hope I can keep challenging myself to figure out the styling. I would definitely make it again.

So there you have it, a somewhat positive review of a CCP look! Of course, it has been 10 months since I made it, so I'm going off my notes and not my feelings. Your mileage may vary!

Wednesday, September 8, 2021

Workout Set and Luna Top

If I make enough workout clothes, I WILL work out, right? I'll let you know.

I'm not a leggings gal. I know a lot of people wear them on the reg, but I'd rather throw on a pair of comfy Hudson Pants. However, now that my kids are in school I'd like to explore an out of the house yoga class, and obviously a cute workout set is vital for that goal. I asked in the Fabric Fairy group about which fabric was best for leggings, and most of the ladies recommended the Olympus line. I previously used Olympus for an Anouk Bodysuit, so I was familiar with its properties, but I decided I wanted something just a touch lighter weight. I ended up ordering one of the Marl Poly Spandex knits.

I REALLY like this fabric. It feels thick but super stretchy, and not too heavy. I combined it with a red mesh that I had leftover from making my husband a bike jersey ages ago.

The pattern I used for the bottoms is the Lily Leggings from Rebecca Page. This pattern has a lot of options, I added all the bells and whistles with colorblocking and a waistband phone pocket. I omitted the ankle cuffs. The topstitching with my coverstitch is somewhat at random so don't ask for an explanation there.

The rise is pretty high on this pattern, if you didn't want the phone pocket you could cut the waistband height in half for a mid-rise option. I found the fit to be perfect (I made a size Small for a 38" hip) but I did think the pattern could benefit from notches since it had so many pieces that needed lined up. I also noticed that for the view with the side stripes, the pattern omitted those pages in the printing guide.

For the bra, I also used an RP pattern, the Sports Bra. I usually wear a version of the Pneuma Bra, but decided to try something more substantial. The sizing on this pattern was pretty complicated. There were multiple cup sizes and band sizes. I measured myself following the directions and ended up with a D cup and 30" band. I feel like the volume of the cups is correct, but an underwire might contain everything better. I also have some side boob spillage (yeah, I said it) and feel like the straps are a touch too short. Overall, a good first stab at the sizing but some tweaks might help. There is a TON of fit advice in the pattern so I'll be circling back to that.

I used the marl for the bra and lined it with black nylon/spandex from my stash. I only had one hook and eye so I sewed the back elastic closed instead of using two hook and eye sets. This super cool band elastic is from Madalynne.

The last piece of this set is the free Luna Tank from Helen's Closet. The Luna has two views, this one is the cropped version. The Luna is super simple, the front and back are the same pattern piece. I made a size 4/6 for my 33"-34" bust. I like the bodice sizing but think perhaps it's a little tight under the arms (sensing a theme here?). The top isn't hemmed so this is a super fast sew.

I'm excited to hit a yoga class soon to give these pieces a try!

Disclaimer: I received all patterns and the grey marl fabric for free as part of the Fabric Fairy Promo Team and Rebecca Page Brand Ambassador Team. I purchased the red fabric. Affiliate links have been used. All opinions are my own. 

Newsletter sign up

.